


34
Basic Operation
This section describes the procedures for viewing live images by
using the front panel of this unit.
Memo :
●
To operate by connecting a mouse (sold separately), refer to
[Viewing Live Images via Mouse Control] (
A
Page 36).
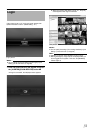
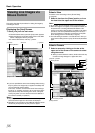
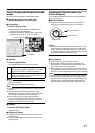
Displaying the [Live] Screen
1 Press the [LIVE/BROWSE] button when the
wallpaper *1 or main menu *2 screen is
displayed.
●
Press the [LIVE/BROWSE] button when the [Browse]
screen is displayed.
●
Press the button to toggle between the [Live] and [Browse]
screens.
Select a View
For details on the view settings, refer to [Screen Setup]
(
A
Page 60).
1 Press the [PTZ/PRESET] button to switch the
[PTZ/PRESET] indicator to the blinking mode
●
Press the [PTZ/PRESET] button to switch the [PTZ/
PRESET] indicator between the lit and blinking modes.
2 Press the [15/ZOOM IN](ZOOM IN/ENTER) and
[14/ZOOM OUT](ZOOM OUT/CANCEL) buttons
to select a view
`
Note :
●
Do not switch the view frequently within a short time interval.
●
When live images do not appear on VN-C625U/VN-C655U, set
the password for connecting VN-C625U/VN-C655U on the
camera unit as well as this unit again. For details on the setting
procedures, refer to the [INSTRUCRTIONS] of the camera in
use and procedures for setting the root password on the [Edit
device settings] screen in this manual (
A
Page 87).
●
The audio setting is restored to
A
No Audio Sources
B
when you
return from the setting screen to [Live]. Select the parameters
again.
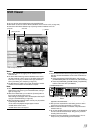
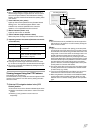
Select a Camera
Select the camera image that you want to view as follows.
1 Press the [SELECT] button
●
The [SELECT] indicator lights up.
2 Enter the camera number with the keypad
●
Enter using the [1] to [16] keys in the case of VR-N1600U/
E, and [0] to [9] in the case of VR-N900U.
Memo :
●
You can specify a camera number between 10 to 19 by pressing
[10/0] followed by a number from [10/0] to [9]. (VR-N1600U/E)
●
You can specify a camera number between 10 to 19 by pressing
[0] followed by a number from [0] to [9]. Numbers from 20 cannot
be selected. (VR-N900U)
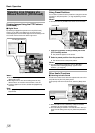
●
When you have selected a camera, the blue bar at the top
of each live image changes to a lighter blue tone.
●
Each bar comes with a tri-color square indicator, which
indicates the following features, as well as characters that
indicate the operating status of the camera.
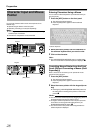
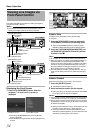
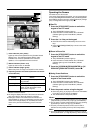
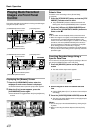
Viewing Live Images via
Front Panel Control
OPERATE
RECCONTROL
LIVE/BROWSE
SELECT
PTZ/PRESET
SERIAL
㧝 㧞 㧟
㧠
㧡
㧢*1/'
㧣
㧥
㧤
CANCEL Z OOMOUT ZOOMIN ENTER
WARNING
ALARM
HDD
LOCK
SEARCHFUNCTION ALARMCLEARKEY REC/STOP STOP(PB) PLAY
SKIP
REV FWD
VR-N900U
VR-N1600U/E
[14/ZOOM OUT] Button
[15/ZOOM IN] Button
[REC CONTROL] Button
[ALARM CLEAR] Button
[FUNCTION]
Button
Keypad
[PTZ/PRESET] Button
[SELECT] Button
[LIVE/BROWSE] Button
[ZOOM OUT/CANCEL] Button
[ZOOM IN/ENTER] Button
[REC CONTROL] Button
[ALARM CLEAR] Button
[FUNCTION]
Button
Keypad
[PTZ/PRESET] Button
[SELECT] Button
[LIVE/BROWSE] Button
*1 Wallpaper Screen *2 Main Menu Screen
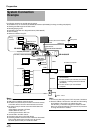
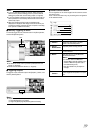
NVRViewer
[Live] Screen
[Browse] Screen