


81
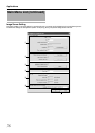
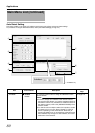
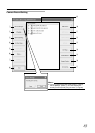
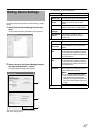
B IP Lease Parameter ^
Start Address ● 192.168.0.100 For specifying the first IP address to be assigned to the
cameras.
Unit ● 20Units
1Unit to 99Units
For selecting the number of IP addresses to be assigned to the
cameras. The selected number of IP addresses will be
assigned starting from the first IP address.
Subnet Mask ● 255.255.255.0 For specifying the subnet mask for the cameras.
Gateway ● 192.168.0.254 For specifying the gateway for the cameras.
DNS Server
Primary ● 192.168.0.253 For specifying the primary DNS for the cameras.
Secondry ● 192.168.0.252 For specifying the secondary DNS for the cameras.
Domain Name ^ For specifying the domain name for the cameras.
C Lease Time Limit ● No
Ye s
For specifying the valid period of the IP address assigned to
the cameras.
If AYe s B is selected, you can set the lease time in units of hours.
(Setting value: 1 hour to 99 hours)
^
D Client ● Only Camera
Any Client
For selecting whether to apply restrictions on the device when
assigning the IP address. If AOnly CameraB is selected, IP
address will only be assigned to the corresponding camera. If
AAny ClientB is selected, IP address will be assigned to all
devices.
^
E IP Information ^ The [IP Information] list contains information on the [IP
address] of the automatically detected camera, MAC address,
number of video CH, manufacturer, and model.
Click [Auto Detect] to start auto detect and display the result.
The camera at the top of the list is used with priority.
You can click the Sort button to sort the order of detected
cameras.
There are five types of sort buttons, including Sort by [IP], Sort
by [MAC], Sort by [CH], Sort by [MAKER], and Sort by
[MODEL] buttons.
Select the detected cameras, followed by clicking the [Up] or
[Down] button to change the order of the cameras.
Deselect the check box of any camera that you are not using.
After doing so, click [Entry]-[OK]. The [Autodetect Device]
screen appears. After entering the camera password, the
[Camera Record Setting] screen appears. Clicking [Close]
automatically creates a Default View. To save this view, change
its name.
Memo :
● When multicast packets are configured such that they do not
pass through the network equipment, such as a switching
hub, the Auto Detect of the camera may not function
properly.
● [Analog-in] is the built-in analog input of VR-N900U. The
highest priority is given to the number of CH used during
configuration. (VR-N900U)
● Devices other than the cameras may appear in the list.
Uncheck the boxes of these devices.
Note :
● Deselecting the [Analog-in] check box disables the [ALARM
IN 1 to 4] signal input terminal at the rear of the unit.
(VR-N900U)
A Page 113
A Page 23
F Reserve MAC
Address
^ Configure the [Reserve MAC Address] if you want to assign a
specific IP address to the cameras. A specific IP address is
always mapped to a MAC address. Enter a value in the [MAC]
and [IP] fields, and click [Add] to set the addresses. To cancel
the setting, select a displayed MAC and IP address, and click
[Del].
^
G OK/Cancel ^ Clicking this button closes the setup screen, and starts/stops
the IP address assignment function according to the settings.
^