


- 280 -
Installing driver over the network
You need to download Linux software packages from the Dell website to install the printer
software (http://www.dell.com find your product Support or Downloads).
Install the Linux driver and add network printer
1
Make sure that the machine is connected to your network and powered on. Also, your
machine’s IP address should have been set.
2
Download the Unified Linux Driver package from the Dell website.
3
Extract the Unified Linux Driver package and open the new directory.
4
Double-click the
cdroot
autorun
.
5
The Dell installer window opens. Click
Next
.
6
The add printer wizard window opens. Click
Next
.
7
Select network printer and click
Search
button.
8
The machine’s IP address and model name appears on list field.
9
Select your machine and click
Next
.
10
Input the printer description and
Next
.
11
After the machine is added, click
Finish
.
12
When installation is done, click
Finish
.
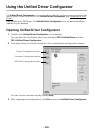
Add a network printer
1
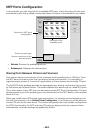
Double-click the
Unified Driver Configurator
.
2
Click
Add Printer
.
3
The
Add printer wizard
window opens. Click
Next
.
4
Select
Network printer
and click the
Search
button.
5
The printer’s IP address and model name appears on list field.
6
Select your machine and click
Next
.
7
Enter the printer description and click
Next
.
8
After the machine is added, click
Finish
.