


- 296 -
Clearing the printer NVRAM
CAUTION: Before clearing the memory, make sure that all fax jobs have been
completed, or you will lose those jobs.
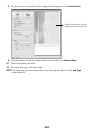
You can selectively clear information stored in your printer’s memory.
1
Press
My Settings
Machine Setup
from the home screen.
2
Scroll to select
Restore Options
.
3
Scroll until you see the option you want to clear.
•
Printer Setup
: Clears all of the data stored in the memory and resets all of your
settings to the factory default.
•
Paper Setup
: Restores all of the Paper Setting options to the factory default.
•
Tray Behavior
: Restores all of the Tray Behavior options to the factory default.
•
Copy Default
: Restores all of the copy options to the factory default.
•
Fax Default
: Restores all of the Fax Setup options to the factory default.
•
Email & Fax Default
: Restores all of the Email & Fax options to the factory default.
•
Access Google Drive Default
: Restores all of the Google Drive options to the
factory default.
•
My Calendar Default
: Restores all of the My Calendar options to the factory
default.
•
Scan to SharePoint Online Default
: Restores all of the Scan to SharePoint Online
options to the factory default.
•
My Forms Default
: Restores all of the My Forms options to the factory default.
•
My Files Default
: Restores all of the My Files options to the factory default.
•
Out-going Fax Report
: Clears all records of your Out-going Fax Report.
•
In-coming Fax Report
: Clears all records of your In-coming Fax Report .
•
Email Sent Reports
: Clears all records of your sent Email.
4
Press
Start
( ) on the screen.
The selected memory is cleared.
5
Press the home icon ( ) to return to Home Screen.