


- 293 -
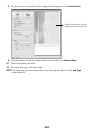
9
Check the
Collate
option to receive copies already sorted.
10
Check the
Reverse Order
option to receive copies in the reverse order.
11
Check the
Make Default
option to set this printer as default.
12
Click
OK
to add the printer.
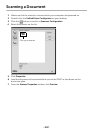
13
Select the option you want.
14
Scan and save your scanned image.
NOTE: For later use, you can save as your scan settings and add it to the Job
Type drop-down list.
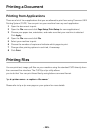
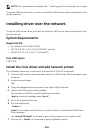
Printing a Document
After installing the printer, choose any of the image, text, PS files to print.
1
Execute “
printui <file_name_to_print>
” command.
For example, if you are printing “
document1
”
printui
document1
This will open the UNIX Printer Driver
Print Job Manager
in which the user can select
various print options.
2
Select a printer that has been already added.
3
Select the printing options from the window such as
Page Selection
.
4
Select how many copies are needed in
Number of Copies
.
NOTE: To take advantage of the printer features provided by your printer driver,
press Properties.
5
Press
OK
to start the print job.
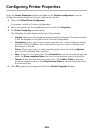
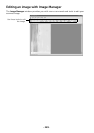
Changing the machine settings
The UNIX printer driver
Print Job Manager
in which the user can select various print options
in printer
Properties
.
The following hot keys may also be used: “H” for
Help
, “O” for
OK
, “A” for
Apply
, and “C” for
Cancel
.
General tab
•
Paper Size
: Set the paper size as A4, Letter, or other paper sizes, according to your
requirements.