


31
Getting Started / Préparatifs
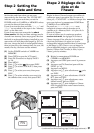
Set the date and time when you use your
camcorder for the first time. The “CLOCK SET”
indicator will appear each time you set the
POWER switch to CAMERA or MEMORY unless
you set the date and time settings.
If you do not set the date and time, “-- -- ----” and
“--:--:--” are recorded on the tape or the “Memory
Stick” as the data code.
If you do not use your camcorder for about
three months, the date and time settings may be
cleared from memory (bars may appear) because
the built-in rechargeable battery installed in your
camcorder will have been discharged (p. 281). In
this case, charge the built-in rechargeable battery,
then set your area, the summer time, the year, the
month, the day, the hour and the minute.
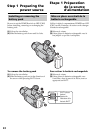
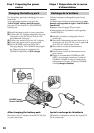
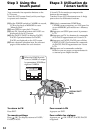
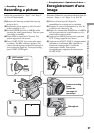
(1) Set the POWER switch to CAMERA or
MEMORY.
(2) Press OPEN to open the LCD panel.
(3) Press FN (Function) to display PAGE1
(p. 34).
(4) Press MENU.
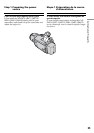
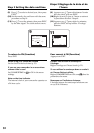
(5) Press r/R to select , then press EXEC.
(6) Press r/R to select CLOCK SET, then press
EXEC.
(7) Press r/R to select your area, then press
EXEC.
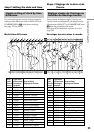
(8) Press r/R to select whether your area is in
the summer time or not, then press EXEC.
Réglez la date et l’heure lorsque vous utilisez le
caméscope pour la première fois. Si vous ne le
faites pas, « CLOCK SET » s’affichera chaque fois
que vous réglerez le commutateur POWER sur
CAMERA ou sur MEMORY.
En pareil cas, « -- -- ---- » et « --:--:-- » sont
enregistrés comme code de données sur la
cassette ou le « Memory Stick » à la place de la
date et de l’heure.
Si vous n’utilisez pas le caméscope pendant
environ trois mois, les réglages de la date et
l’heure risquent d’être effacées de la mémoire
(des tirets s’affichent à la place) car la pile
rechargeable intégrée installée dans le caméscope
se décharge (p. 281). Dans ce cas, rechargez la
pile rechargeable intégrée, puis réglez le fuseau
horaire, l’heure d’été, l’année, le mois, le jour,
l’heure, puis les minutes.
(1) Réglez le commutateur POWER sur
CAMERA ou MEMORY.
(2) Appuyez sur OPEN pour ouvrir le panneau
LCD.
(3) Appuyez sur FN (Fonction) pour afficher
PAGE1 (p. 34).
(4) Appuyez sur MENU.
(5) Appuyez sur r/R pour sélectionner , puis
sur EXEC.
(6) Appuyez sur r/R pour sélectionner CLOCK
SET, puis sur EXEC.
(7) Appuyez sur r/R pour sélectionner votre
fuseau horaire, puis sur EXEC.
(8) Appuyez sur r/R pour indiquer si l’heure
d’été s’applique dans votre fuseau horaire,
puis sur EXEC.
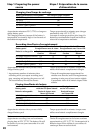
Step 2 Setting the
date and time
(continued on the following page)/(suite page suivante)
Etape 2 Réglage de la
date et de
l’heure
5 6
SETUP MENU
CLOCK SET
USB STREAM
LANGUAGE
DEMO MODE
EXIT
RET.
EXEC
Rr
EXEC
Rr
––:––:––
7
8
EXEC
Rr
EXEC
Rr
EXIT
EXIT
EXIT
SUMMERTIME OFF
DATE
Y M D
GMT +0.0
Lisbon, London
CLOCK SET
AREA 1
R
r
– – – – – – – – – – : – –
CLOCK SET
AREA 2
GMT +1.0
Berlin, Paris
SUMMERTIME OFF
ON
DATE
Y M D
– – – – – – – – – – : – –
RRRRR
rrrrr
GMT +1.0
Berlin, Paris
SUMMERTIME OFF
DATE
Y M D
CLOCK SET
AREA 2
2003 1 1 0 : 00
3
FN