


a
b
c
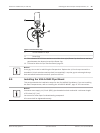
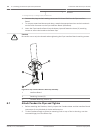
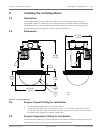
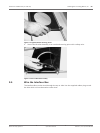
Figure 8.14: Pendant to Roof / Pipe Mount Attachment
1
Tilt Dome
2 Hook and drop
2a Dome Cap
2b Recessed Hinge Pin
2c Dome Connector
3 Rotate down to engage dome connector
4 Tighten the two (2) mounting screws to a minimum torque of 10-12 N-m (90-105 in.-lbs)
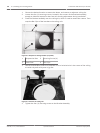
3. Drop the Pendant down slightly to engage the dome hook and hinge pin of the Dome Cap,
allowing the dome to rotate around the hinge pin.
4. Rotate the dome housing down to a vertical position and gently push upward to engage
the connector on top of the dome housing.
!
Caution!
If you feel any resistance when rotating the dome housing or when engaging the connector,
stop immediately and start over.
5. Hold the housing firmly in position and alternately tighten the two (2) 5-mm Allen head
mounting screws from above to a torque value of 10-12 N-m (90-105 in.-lbs).
!
Caution!
You must tighten the two mounting screws to a minimum torque of 10-12 N-m (90‑105 in.-lbs)
to ensure a proper seal between the arm and the housing.
6. Rotate the arm to swing the camera out from the roof and into position, if installing a
Parapet Roof Mount.
7. Tighten the three (3) 10-mm (3/8-inch) stainless steel hex bolts on the bracket to lock the
Parapet Arm in position.
!
Caution!
Do not over tighten the bolts. The maximum torque is 34 N-m (25 ft-lb).
AutoDome 7000 Series (IP and HD) Installing the Roof Parapet and Pipe Mounts | en 55
Bosch Security Systems Operation Manual 2013.07 | 1.2.2 | F.01U.283.679