


70
1
Camera Basics
2
Auto Mode /
Hybrid Auto Mode
3
Other Shooting Modes
4
P Mode
5
Tv, Av, M, and C Mode
6
Playback Mode
7
Wi-Fi Functions
8
Setting Menu
9
Accessories
10
Appendix
Index
Before Use
Basic Guide
Advanced Guide
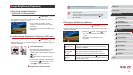
Adjusting Colors
Still Images
Movies
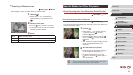
Colors can be manually adjusted in [ ] mode.
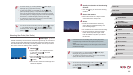
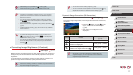
1
Choose a shooting mode.
zChoose [ ] (
=
66), [ ] (
=
67),
[ ] (
=
68), or [ ] (
=
69).
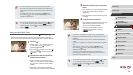
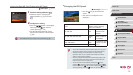
2
Choose color adjustment.
zPress the [ ] button, and then choose
[ ] in the menu (
=
29).
3
Adjust the setting.
zTurn the [ ] ring or press the [ ][ ]
buttons to adjust the correction level for B
and A, and then press the [ ] button.
zOnce the setting is complete, [
] is
displayed.
● B represents blue and A, amber.
● Skin tones remain the same when you adjust colors in [
] mode.
● Advanced settings can be accessed by pressing the [
]
button when the screen in step 2 is displayed (
=
79).
● You can also choose the correction level by touching or dragging
the bar in step 2.
● Advanced settings can be accessed by touching [
] when the
screen in step 2 is displayed (
=
79).
● There will be a delay before you can shoot again, as the camera
processes the images.
● If the camera runs out of battery power or memory card space,
shooting stops and a movie created from the images up to that
point is saved.
● A shooting interval of [1 min.] is not available with these effects:
[
], [ ], [ ], or [ ].
● Sound is not recorded.
● For easier viewing, try choosing MENU ► [ ] tab ► [Night Display]
► [On] (
=
92) before shooting.
● You can also access the screen in step 2 by choosing MENU (
=
30)
► [
] tab ► [Star Time-Lapse Movie Setting].
● To save each shot collected before the movie is created, choose
MENU (
=
30) ► [ ] tab ► [Save Stills] ► [On]. Note
that these individual images are managed as a single group, and
during playback, only the rst image is displayed. To indicate that
the image is part of a group, [
] is displayed in the upper left
of the screen. If you erase a grouped image (
=
116), all images
in the group are also erased. Be careful when erasing images.
● Try switching to manual focus mode (
=
81) to more accurately
specify the focal position before shooting.
● Even if you specify [Unlimited] in [Shooting Time] and use an
AC adapter kit (sold separately,
=
159), shooting will stop after
about 8 hours, at most.
● You can also choose the shooting mode by choosing [ ] in steps
1 – 2 of “Specic Scenes” (
=
55), touching [ ] to access
the setting screen, touching [
], and then touching the same
option or [
].