


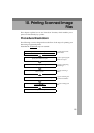

Printing Scan Data
165
10
Note
❒ While the setting screen for
[Enlarge] or [Reduce] is dis-
played, highlighting one of
the preset ratio displays pairs
of "original size → copy pa-
per size" on the third line of
the screen.
H If you want to set a custom ra-
tio for [Enlarge] or [Reduce],
highlight the nearest preset ra-
tio, press [Zoom], and then use
the number keys (or [-] and [+] )
to specify the ratio.
I Press [OK].
This saves the ratio you have
entered, and returns to the sec-
ond page of the Print Settings
screen ( Print Settings 2/2).
Note
❒ Pressing [Cancel] discards the
setting you have entered,
and returns to the previous
screen.
J When you are finished, press
[PrevMenu].
This returns to the Print Settings
screen.
K Press [OK].
This returns to the Print Scan
standby screen, and the print
settings are displayed on the
third line of the screen.
Confirming the Print Settings
You can confirm the current print set-
tings, or the print settings that you
have registered to [Default], [User 1],
[User 2] or [User 3].
Note
❒ You can confirm the [Default] set-
tings by selecting [Manual] in step B
below, unless you configure the
print settings manually. After you
have manually configured the
print settings, selecting [Manual]
displays the current settings.
A
AA
A
While the Print Scan standby
screen is displayed, press [Print].
The Print Settings screen is dis-
played.
B
BB
B
Use the {
{{
{1
11
1 }
}}
} or {
{{
{0
00
0}
}}
} key to high-
light [Manual], [User 1], [User 2] or
[User 3] on the screen, and then
press [Status].
The status screen of your selection
appears.
C
CC
C
Use [Next] and [Prev.] to display
the setting of the setup item you
want to confirm.
D
DD
D
When you are finished, press [Ex-
it].