


NovaJet 800 Series Service Manual
Assembly\Disassembly 5-57
NOTE
The right side fixed nylon helical wedge and pin assembly/flange should
not have to be removed unless the screw length prohibits lower roller
removal. Three 1/8” and 5/32” allen head screws are used to secure
these assemblies).
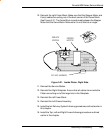
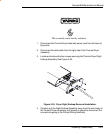
To remove the stepper motor from lower roller remove the 2 securing
screws, 2 nuts, and spring. Note the orientation of the motor with respect
to the lower roller. For new motor installations verify support bracket to
motor gap is .005” to .015” on the non-screwed side using a feeler gauge.
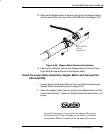
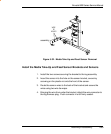
Lower Roller Installation Tip (NovaJet 880)
To install the lower roller/stepper motor assembly:
1. Place all assemblies on a flat surface. Ensure the vacuum fan
openings are facing away from the stepper motor. Fan #1 should be
between rollers 1 & 2 while fan #2 should be between rollers 3 & 4.
2. Install assemblies into printer together and lock vacuum fans in place
first before attaching other assemblies.
NOTE
The thick arm of the center support bracket faces towards the front of
the printer on reinstallation.
Y-Arm Assembly Installation Tip (NovaJet 880)
Before installing the Y-Arm assembly, loosely attach the right fixed-
platen end screws – do not tighten.
NOTE
When installing the Y-Arm assembly alignment of the print head is
referenced to the left fixed-platen end. Install Y-Arm by tightening the 4
screws on the left side first, followed by the right side screws. Ensure
the cutter groove is straight across all three platen sections.