


7
Chapter 7 Location and Function of Parts and Controls 113HDC-900/950/930 Series Product Information Manual
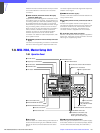
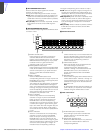
f STANDARD button
When you press this button, the video camera is
initialized to its standard state and the button lights for
several seconds. If you press the button while it lights,
the video camera returns to the state before the button
was lit.
g AUTO SETUP block
For automatic adjustments of cameras.
A Auto adjustment item select buttons
Press and light up these buttons to select the
items to be automatically adjusted.
AUTO HUE: Skin tone detail automatic hue
LEVEL: Gamma balance, knee point, master
black level, etc.
B START/BREAK button
Press to start automatic adjustment of the
selected items. The button lights during
adjustment and goes dark when adjustment is
completed. If you press the button when lit, the
automatic adjustment is canceled and the
button flashes. To stop the flashing, press the
button again.
C WHITE (white balance) button
Press to automatically adjust the white balance.
The button lights during adjustment and goes
dark when adjustment is completed. If you press
this button when lit or the START/ BREAK button,
the automatic adjustment is canceled and the
button flashes. To stop the flashing, press the
button again.
D BLACK (black balance) button
Press to automatically adjust the black balance
and black set. The button lights during
adjustment and goes dark when adjustment is
completed. If you press this button when lit or
the START/ BREAK button, the automatic
adjustment is canceled and the button flashes.
To stop the flashing, press the button again.
Note
If an error occurs during adjustment, the
pressed button flashes.
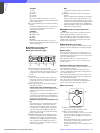
h Camera/CCU function ON/OFF buttons
Various functions of the video camera or the CCU can
be turned on and off from this unit (ON when the button
is lit).
The following switching functions are assigned to four
of the buttons at the factory and the other three buttons
are reserved for future use.
5600K: 5600K -electronic color temperature
conversion function
AUTO KNEE: Auto knee function. When this button is
lit (ON), the knee point is automatically adjusted
according to the light content of the picture.
SKIN DETAIL: Skin tone detail function
CHARACTER: System information display function.
The various information on the entire system is
displayed on the monitor connected to the
CHARACTER connector of the CNU-700. The
display contents can be changed through a menu
operation.
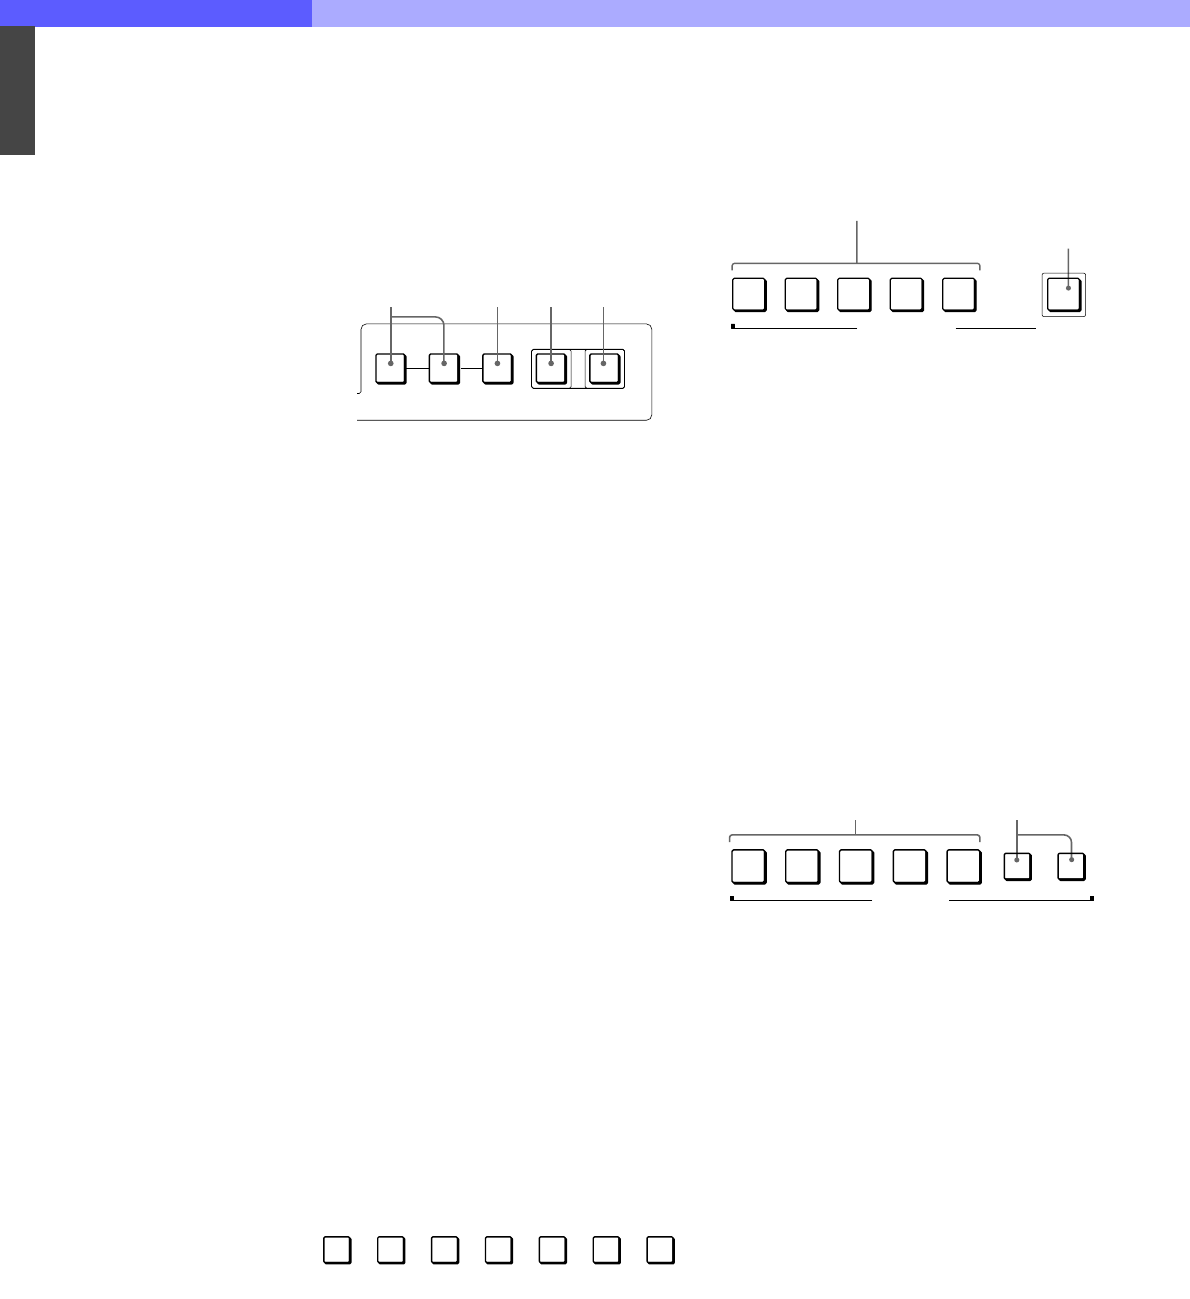
i Scene file control block
A SCENE FILES buttons
While the STORE button is flashing: When
you press one of these buttons, the current
setting data is stored as a file of the
corresponding number.
When the STORE button is dark: The stored
data can be retrieved by pressing and
lighting up the button of the desired number.
Press the lit button to turn it dark and resume
the previous status.
B STORE button
To store a scene file, first press this button so
that the button starts flashing, then press the
SCENE FILES button of the desired number.
When file registration is completed, the STORE
button goes dark. To cancel the registration,
press the flashing button again before pressing
the SCENE FILES button. The STORE button
goes dark.
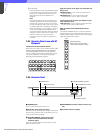
j Monitor output select buttons
Press to select the output signal from the WF2 and
PIX2 OUTPUT connectors of CCU.
A Output signal select buttons
After selecting the output connector of the CCU
by pressing either the WF or PIX button, press to
light the button for the signal to be output. The
signal corresponding to the lit button is output.
R/G/B: Select the R signal, G signal, or B signal.
The signals can be selected either
independently or in combination. When any of
these buttons is pressed, the SEQ (for WF
only) and ENC circuits are turned off.
SEQ (sequence): Effective only for the WF2
OUTPUT connector. When this button is
pressed, the R/G/B circuits are turned off, and
the SEQ signal is output. You can monitor the
waveforms of the three R, G, and B signals in
sequence on a waveform monitor.
ENC (encode): When this button is pressed, the
R/G/B and SEQ circuits are turned off, and the
ENC signal is output.
B Output connector select buttons
WF: Press to light the button when switching the
output signal from the WF2 OUTPUT
connector with the output signal select
buttons. Press the button again to make it go
dark.
PIX: Press and light the button when switching
the output signal from the PIX2 OUTPUT
connector with the output signal select
buttons. Press the button again to make it go
dark.
AUTO SETUP
AUTO
HUE
LEVEL
START/
BREAK
WHITE BLACK
1234
5600K
AUTO
KNEE
SKIN
DETAIL
CHARACTER
12345
STORE
SCENE FILES
1 SCENE FILES button
2 STORE button
RGB
SEQ ENC
WF PIX
MONITOR
1
2