


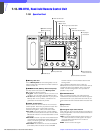
7
Chapter 7 Location and Function of Parts and Controls 133HDC-900/950/930 Series Product Information Manual
Note
The BARS button takes priority to the TEST button. If
the BARS button is lit, press the button to turn it dark
before pressing the TEST button.
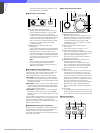
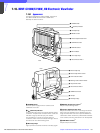
g CLOSE button
Press and light the button to close the iris. To release
the close mode, press the button again so that it goes
dark.
h VTR START/STOP button
Press and light up this button to start a recording
operation. When you press the button when lit, it goes
dark, and recording stops. Using the RM Configuration
menu under the Maintenance menu, you can assign
the CALL button function to this button. In this case,
press to send a call signal to the video camera, on
which the CALL button lights. The tally lamps on the
camera and the red tally lamp on the camera control
unit light when not lit, or go dark when lit. When the
CALL button on the video camera is pressed, the
button on this unit lights and a buzzer sounds.
i VTR playback control buttons
Controls VTR playback operations.
s (stop) button
Press to stop a rewind, fast-forward or playback
operation.
j (rewind) button
Press and light this button to start a rewind operation.
G (play) button
Press and light this button to start a playback
operation.
J (fast forward) button
Press and light this button to start a fast-forward
operation.
7 (recording review) button
Press and light this button to execute a recording
review operation.
Notes
• When the VTR START/STOP button is lit, these
buttons are deactivated. To activate the buttons, first
press the VTR START/STOP button to cancel
Recording mode.
• A part of the VTR control functions of this unit may be
disabled depending on the combination of camera
and VTR. For details, ask your Sony dealer.
j ALARM indicator
Flashes or lights in red when trouble occurs in the
camera system and the self-diagnostic function
activates at the video camera or the camera control
unit.
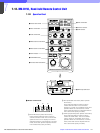
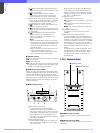
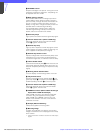
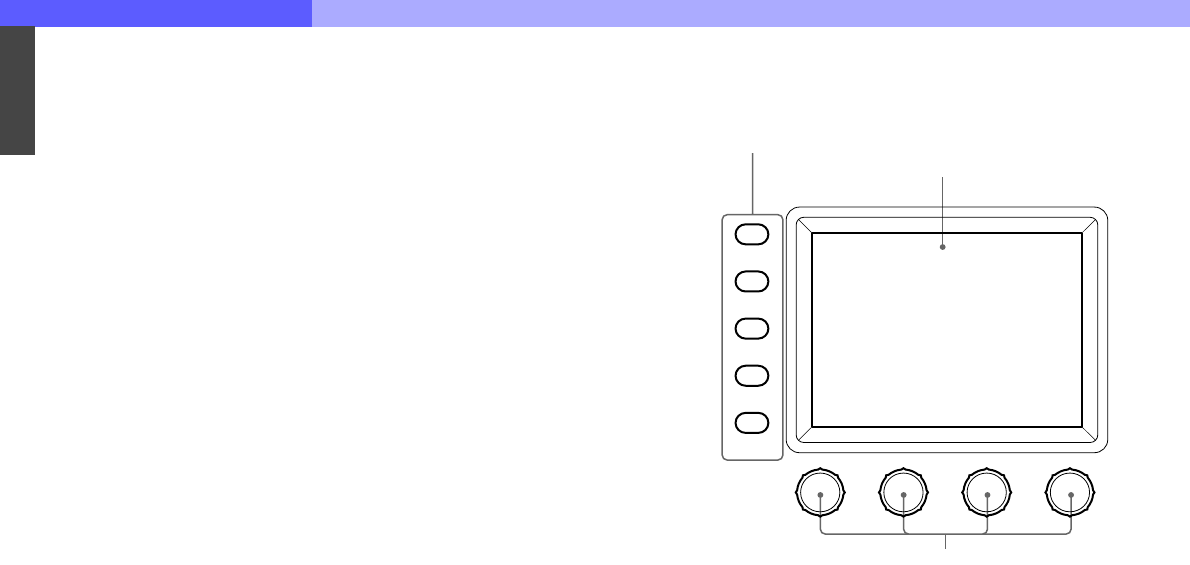
k Menu operation block
A RM menu select/camera menu set buttons
MONITOR: When this button is unlit, you can
select the menus of this unit using the other
buttons (RM Menu mode in which the
functions indicated with white letters for the
buttons are valid). Press and light this button
to display the video signal (SDTV signal only)
from the connected camera on the LCD. This
also permits the menus of the camera to be
operated from this unit (the functions
indicated with blue letters for the buttons and
the leftmost control knob are valid).
FUNCTION/VF DISP (viewfinder display):
With the MONITOR button unlit, the Function
menu of this unit appears on the LCD when
you press and light this button. With the
MONITOR button lit, the character display of
the camera is turned on when you press and
light this button.
MAINTENANCE/VF MENU (viewfinder menu):
With the MONITOR button unlit, the
Maintenance menu of this unit appears on the
LCD when you press and light this button.
With the MONITOR button lit, the unit enters
Camera Menu mode when you press and light
this button. The main menu of the camera
appears on the LCD.
SCENE/CANCEL: With the MONITOR button
unlit, the Scene File menu of this unit appears
on the LCD when you press and light this
button. With the MONITOR button lit, you can
cancel the setting of the camera menu item
selected on the LCD by pressing this button.
PAINT/ENTER: With the MONITOR button unlit,
the Paint menu of this unit appears on the
LCD when you press and light this button.
With the MONITOR button lit, you can register
the setting of the camera menu item selected
on the LCD by pressing this button. When
none of the buttons are lit, the status display
is obtained.
B LCD/touch panel
Normally displays the statuses. When you press
and light the MONITOR button, it displays the
video signal from the connected camera (SDTV
signal only. HDTV signal will not be displayed.).
In RM Menu or Camera Menu mode, the
selected menu is displayed to permit you to
operate the menu.
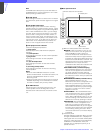
MONITOR
FUNCTION
VF DISP
MENU SELECT
MAINTENANCE
VF MENU
SCENE
CANCEL
PAINT
ENTER
1 RM menu select/camera menu set buttons
2 LCD/touch panel
3Control knobs