


7
Chapter 7 Location and Function of Parts and Controls 125HDC-900/950/930 Series Product Information Manual
Note
If an error occurs during adjustment, the selected
button flashes.
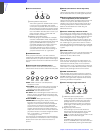
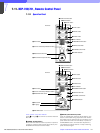
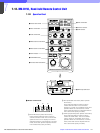
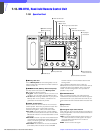
c BLACK (black balance) button
Press to automatically adjust the black balance and
black set. The button is illuminated during adjustment
and remains illuminated until the adjustments are
completed. If you press this button while it is
illuminated, or press the START/BREAK button, the
automatic adjustment is canceled and the button
flashes. To stop it flashing, press the button again.
Note
If an error occurs during adjustment, the pressed
button flashes.
d CALL button
Press to send a call signal to the camera, on which the
CALL button is illuminated. The tally lamps on the
camera and the red tally lamp on the CCU-700/
A700AP are illuminated if they were not lit, or are
turned off if they were already illuminated. When the
CALL button on the camera is pressed, the CALL
button on this panel illuminates and a buzzer sounds.
e WHITE (white balance manual adjustment)
knobs
Used to manually adjust the white balance. Adjust the
R and B signals, respectively.
f BLACK (black balance manual adjustment)
knobs
Used to manually adjust the black balance. Adjust the
R and B signals, respectively.
g EXT (lens extender) indicator
Lights when the lens extender is in use.
h IRIS/MB ACTIVE (iris/master black active)
button
Press and illuminate this button to enable the iris/
master black control block of the panel. When the
PANEL ACTIVE button is pressed, this button also
illuminates.
i SENS (sensitivity) control knob
Used for manual iris adjustment. See the table ‘Iris
adjustment functions’.
j COARSE control knob
Used for manual iris adjustment. See the table ‘Iris
adjustment functions’.
k ALARM indicator
Lights when a problem occurs in the camera system
and the self-diagnostic function is activated at the
camera or the CCU-700A/700AP.
l AUTO button
Press and illuminate the button and the iris
automatically adjusts to the amount of input light. If you
press the button when it is illuminated, the illumination
is turned off and manual iris adjustment is enabled.
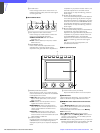
m Camera number/tally indication window
(incorporated with MASTER/SLAVE indications)
The number of the camera being controlled from this
panel is displayed in orange. When a red tally signal is
sent to the camera, its number is displayed in black
against a red background. When a green tally signal is
sent to the camera, the number is displayed in black
against a green background. When the red and green
tally signals are sent simultaneously, the left half of the
background is illuminated red and the right half
illuminated green. In Master/Slave mode, to adjust the
white balance of multiple cameras the upper-left
(MASTER) corner is illuminated orange when the
camera being controlled from this panel is designated
as the master unit, and the upper-right (SLAVE) corner
is illuminated orange when designated as a slave unit.
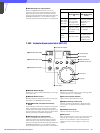
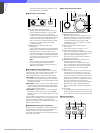
RCP-700-exclusive features
n Master black control ring
Turn to manually adjust the master black.
o IRIS control lever/preview switch
When the AUTO button is not illuminated, you can
adjust the iris manually by moving this lever. When the
AUTO button is illuminated, the reference value for
automatic iris adjustment can be set in a range of +/-1f
stop with this lever. Push it axially to connect the key
signal for preview at the PREVIEW connector. See the
table “Iris adjustment functions.”
RCP-701-exclusive features
n MASTER BLACK control
Turn to manually adjust the master black.
o IRIS control
When the AUTO button is not illuminated, you can
adjust the iris manually by turning the control. When
the AUTO button is illuminated, the reference value for
automatic iris adjustment can be set in a range of +/-1f
stop with this control. See the table ‘Iris adjustment
functions’.
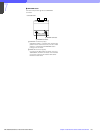
p Iris gauge
The white line on the gauge provides a click position
for the IRIS control. Turn the gauge to set the line to the
most frequently used iris position, and it can be used
as the reference for manual iris adjustment. The gauge
rotates infinitely in either direction. When no click
position is required, set the line outside the rotation
range of the IRIS control.
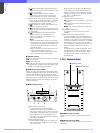
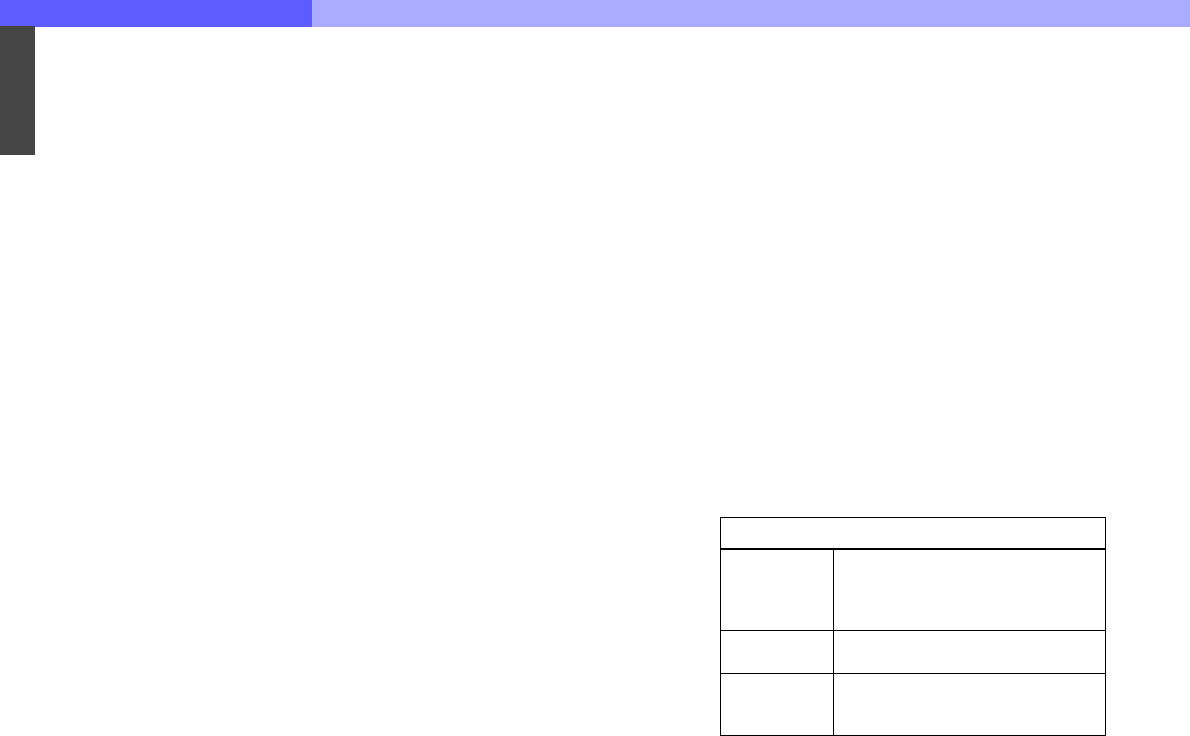
Iris adjustment functions
IRIS lever
(RCP-700)
IRIS control
(RCP-701)
Adjust the iris within the variable con-
trols.
COARSE
control
Sets the lower limit for CLOSED.
SENS control
Sets the upper limit for OPEN
according to the CLOSED value set
by the COARSE control.