


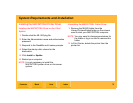

System Requirements and Installation
Back
IndexContents
Next
10
Installing WINDOWS Printer Drivers
Installing the WINDOWS 2000/XP Driver on the
Server System
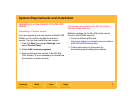
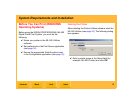
1. Insert the KODAK PROFESSIONAL ML-500
Digital Photo Print System CD.
2. Select the appropriate language.
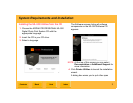
3. Click Printer Drivers to display the Add Printer
Wizard screen.
4. Follow the Add Printer Wizard instructions.
Choose the appropriate settings for the wizard
dialog boxes, as outlined here:
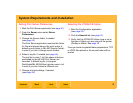
✔ Local or Network Printer dialog box
a. Select Local Printer.
b. Uncheck Automatically detect and
install my Plug and Play printer.
c. Click Next.
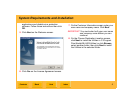
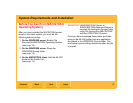
✔ Select the Printer Port dialog box
(WINDOWS 2000), Select a Printer Port
dialog box (WINDOWS XP)
Choose Use the following port and select
the EKSDn port where n is the number that
was used when the port monitor was
installed. Click Next.
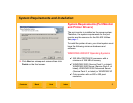
✔ Add Printer Wizard dialog box
(WINDOWS 2000), Install Printer
Software dialog box (WINDOWS XP)
This dialog box displays a list of
manufacturers and their associated
printers.
a. Click the Have Disk... button to display
the Install from Disk dialog box.
b. Click the Browse... button to display the
Locate File dialog box.
IMPORTANT: By default, the Add Printer Wizard
displays the last .INF file installed (the
Port Monitor .INF file). DO NOT
choose the Port Monitor .INF file; this
file will not install the driver.