


100
SONICWALL SONICOS ENHANCED 2.5 ADMINISTRATOR’S GUIDE
C
HAPTER
15:
Configuring NAT Policies
translation between the private and public address. With this policy in place, the SonicWALL security
appliance translates the server’s public IP address to the private IP address when connection
requests arrive via the WAN (X1) interface.
Below, you create the entry as well as the rule to allow HTTP access to the server. You need to create
the access policy that allows anyone to make HTTP connections to the webserver via the webserver’s
public IP address.
Note: With previous versions of firmware, it was necessary to write rules to the private IP address.
This has been changed as of SonicOS Enhanced. If you write a rule to the private IP address, the rule
does not work.
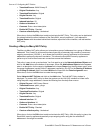
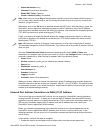
Go to the Firewall>Access Rules page and choose the policy for the ‘WAN’ to ‘Sales’ zone
intersection (or, whatever zone you put your server in). Click on the ‘Add…’ button to bring up the pop-
up access policy screen. When the pop-up appears, enter in the following values:
•Action: Allow
• Service: HTTP
• Source: Any
• Destination: webserver_public_ip
• Users Allowed: All
• Schedule: Always on
• Logging: checked
• Comment: (enter a short description)
When you are done, attempt to access the webserver’s public IP address using a system located on
the public Internet. You should be able to successfully connect. If not, review this section, and the
section before, and ensure that you have entered in all required settings correctly.
Inbound Port Address Translation via One-to-One NAT Policy
This type of NAT policy is useful when you want to conceal an internal server’s real listening port, but
provide public access to the server on a different port. In the example below, you modify the NAT
policy and rule created in the previous section to allow public users to connect to the private
webserver on its public IP address, but via a different port (TCP 9000), instead of the standard HTTP
port (TCP 80).
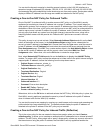
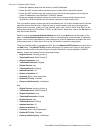
First, your need to create a custom service for the different port. Go to the Firewall>Custom
Services page and select the Add button. When the pop-up screen appears, give your custom
service a name such as “webserver_public_port”, enter in “9000” as the starting and ending port, and
choose “TCP(6)” as the protocol. When done, click on the OK button to save the custom service.
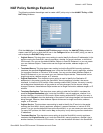
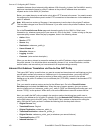
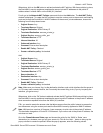
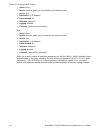
Next, you modify the NAT policy created in the previous section that allowed any public user to
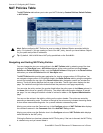
connect to the webserver on its public IP address. Go to the Network>NAT Policies menu and click
on the Edit button next to this NAT policy. The Edit NAT Policy window is displayed for editing the
policy. Edit the NAT policy so that it includes the following from the drop-down menus:
• Original Source: Any
• Translated Source: Original
• Original Destination: webserver_public_ip
• Translated Destination: webserver_private_ip
• Original Service: webserver_public_port (or whatever you named it above)
• Translated Service: HTTP
• Inbound Interface: X1