SONICWALL SONICOS 2.5 ENHANCED ADMINISTRATOR’S GUIDE
137
Configuration Task List
Adding Access Rules
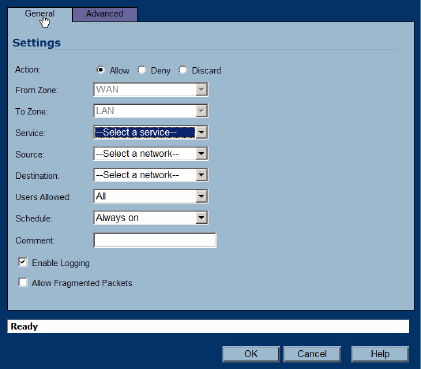
To add access rules to the SonicWALL security appliance, perform the following steps:
1.
Click Add at the bottom of the Access Rules table. The Add Rule window is displayed.
2. Select Allow | Deny | Discard from the Action list to permit or block IP traffic.
3. Select the service or group of services affected by the access rule from the Service list. The
Default service encompasses all IP services.
If the service is not listed, you must define the service in the Add Service window. Select Create
New Service or Create New Group to display the Add Service window or Add Service Group
window.
4. Select the source of the traffic affected by the access rule from the Source list. Selecting Create
New Network displays the Add Address Object window.
5. If you want to define the source IP addresses that are affected by the access rule, such as
restricting certain users from accessing the Internet, type the starting IP addresses of the address
range in the Address Range Begin field and the ending IP address in the Address Range End
field. To include all IP addresses, type * in the Address Range Begin field.
6. Select the destination of the traffic affected by the access rule from the Source list. Selecting
Create New Network displays the Add Address Object window.
7. From the Users Allowed menu, add the user or user group affected by the access rule.
8. Select a schedule from the Schedule menu. The default schedule is Always on.
9. Enter any comments to help identify the access rule in the Comments field.
