174
SONICWALL SONICOS ENHANCED 2.5 ADMINISTRATOR’S GUIDE
C
HAPTER
29:
Configuring VPN Policies
14
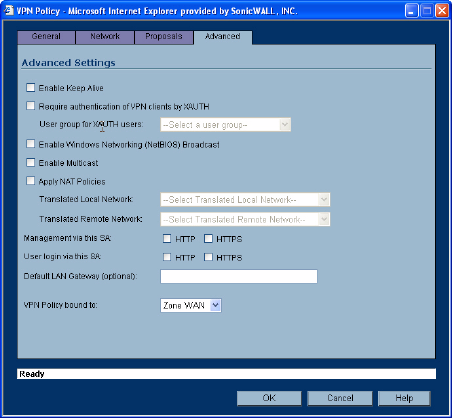
Click Advanced.
15
Select Enable Keep Alive to use heartbeat messages between peers on this VPN tunnel. If one
end of the tunnel fails, using Keep Alives will allow for the automatic renegotiation of the tunnel
once both sides become available again without having to wait for the proposed Life Time to
expire.
16
To require XAUTH authentication by users prior to allowing traffic to traverse this tunnel, select
Require authentication of VPN client by XAUTH, and select a User group to specify allowed
users from the User group for XAUTH.
17
Select Enable Windows Networking (NetBIOS) Broadcast to allow access to remote network
resources by browsing the Windows® Network Neighborhood.
18
Select Enable Multicast to allow IP multicasting traffic, such as streaming audio (including VoIP)
and video applications, to pass through the VPN tunnel.
19
Select Apply NAT Policies if you want the SonicWALL to translate the Local, Remote or both
networks communicating via this VPN tunnel. To perform Network Address Translation on the
Local Network, select or create an Address Object in the Translated Local Network menu. To
translate the Remote Network, select or create an Address Object in the Translated Remote
Network menu. Generally, if NAT is required on a tunnel, either Local or Remote should be
translated, but not both. Apply NAT Policies is particularly useful in cases where both sides of a
tunnel use either the same or overlapping subnets.
20
To manage the remote SonicWALL through the VPN tunnel, select HTTP, HTTPS, or both from
Management via this SA. Select HTTP, HTTPS, or both in the User login via this SA to allow
users to login using the SA.
21
If you wish to use a router on the LAN for traffic entering this tunnel destined for an unknown
subnet, for example, if you configured the other side to Use this VPN Tunnel as default route for
all Internet traffic, you should enter the IP address of your router into the Default LAN Gateway
(optional) field.
22
Select an interface or Zone from the VPN Policy bound to menu. A WAN Zone is the preferred
selection if you are using WAN Load Balancing and you wish to allow the VPN to use either WAN
interface.
23
Click OK.
24
Click Apply on the VPN>Settings page to update the VPN Policies.


