


372 Ion Operations Manual
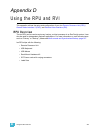
RVI3 and RVI Overview
The RVI functions as a remote user interface to access and modify the contents of an entire Ion
show file. You may configure the RVI to run Ion software in “Client” or “Offline” mode.
This appendix outlines the setup and simple configuration of your Remote Video Interface (RVI) for
use with an Ion Control System.
Net3 RVI 3 ships with the following:
• Remote Video Interface
• USB Keyboard
• USB Mouse
• Rack Mount Hardware Kit
• IEC Power cord
• Label Set
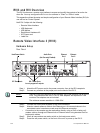
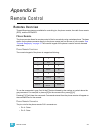
Remote Video Interface 3 (RVI3)
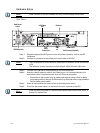
Hardware Setup
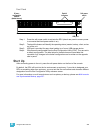
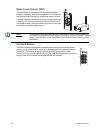
Rear Panel
Step 1: Attach the IEC power cord to the power connector, then to the IEC receptacle.
Step 2: Connect any monitors to the proper ports on the back of the RVI 3.
Step 3: Connect the mouse and keyboard to the USB connectors.
Step 4: Attach a network ethernet cable to the Ethernet port. All communications to the
associated control console are made over this Ethernet connection.
• Connection to the console may be made either directly using a Cat5 or better null-
modem cable or through an Ethernet hub or Ethernet switch using standard Cat5 or
better patch cables.
Step 5: When all connections are made, switch on the hard power switch
Step 6: Press the soft power switch, on the front of the unit, to power up the RVI 3.
Note:
The RVI 3 with Ion support up to two monitors. Any of the monitors can be DVI or
VGA. The connectors are DVI-I. DVI-I to VGA adapters are required for VGA
monitors.The adapters are not included.
The minimum screen resolution is 1280x1024.
Hard Power Switch
DVI -I Video Ports
Ion only supports 2 outputs.
Audio Ports
(Not Currently Enabled)
IEC Receptacle USB 2.0
x6
Ethernet
Port 1
Ethernet
Port 2