


D Using the RPU and RVI 373
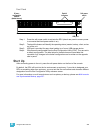
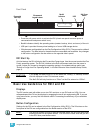
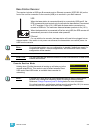
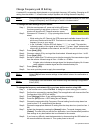
Front Panel
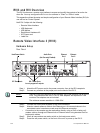
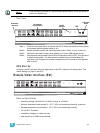
Step 1: Press the soft power switch to activate the RVI 3 (check rear panel to ensure power
is connected and hard power switch is on).
Step 2: Backlit indicators identify the operating status (client, offline, in sync) of the unit.
Step 3: USB port is provided for easy show loading to or from a USB storage device.
Step 4: 20 buttons are configurable from the Eos Configuration Utility (ECU). They are set to
a default configuration. The label strips for these buttons are removable and
reversible. Any changes to the button configuration can be written on the opposite
side in pencil.
RVI3 Start Up
At startup, the RVI will open in the Ion application or the ECU, based on the setup option. The
default setting is to open in the ECU.
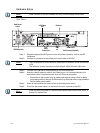
Remote Video Interface (RVI)
.
Electrical Specification
• Operating voltage 100-240 VAC, 50-60Hz (2 amps at 120 VAC).
• Ambient temperature and humidity 0 - 35° C, 95% non-condensing humidity, maximum.
• Storage temperature and humidity 0 - 35° C, 95% non-condensing humidity
• CE and ETL Compliant.
• Installation Category II, indoor use only.
• May operate up to 2000 meters altitude.
Note:
If the unit does not power up, check the hard power switch, on the rear panel, to
ensure it is switched on.
Live
Tab
Escape
Select M901
M902
M903 M904
Blind
M905
M906 M907
M908
Go
Primary
Master
Backup
Sync
Client
Offline
Backlit
indicators
Soft Power
Switch
Removable
label strip
USB
20 command
keypad buttons
Live
Tab
Escape
Select M901
M902
M903 M904
Blind
M905
M906 M907
M908
Go
Primary
Master
Backup
Sync
Client
Offline