


374 Ion Operations Manual
Hardware Setup
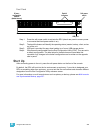
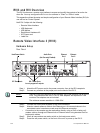
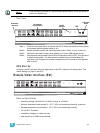
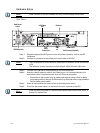
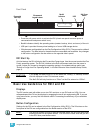
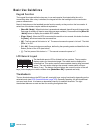
Rear Panel
Step 1: Attach the appropriate IEC power cord to the power connector, then to the IEC
receptacle.
Step 2: Connect any monitors to the proper ports on the back of the RVI.
Step 3: Connect the USB mouse and keyboard to the USB connectors.
Step 4: Attach a network ethernet cable to the Ethernet port. All communications to the
associated control console are made over this Ethernet connection.
• Connection to the console may be made either directly using a Cat5 or better
null-modem cable or through an Ethernet hub or Ethernet switch using standard
Cat5 or better patch cables.
Step 5: When all connections are made, switch on the hard power switch.
Step 6: Press the soft power switch, on the front of the unit, to power up the RVI.
Note:
Older versions of the RVI hardware will vary from the images shown here.
Note:
The RVI supports up to two monitors, either two DVI monitors, or one DVI and one
VGA.
The minimum screen resolution must be at least 1280x1024 with 32bit color.
Note:
If the unit does not power up, check the hard power switch on the rear panel, to
ensure it is switched on.
IEC Receptacle
DVI-D
Video Ports
USB
x6
Ethernet
Hard Power
Switch
VGA Video
Port
Audio Ports
(Not Currently Enabled)