


380 Ion Operations Manual
Change Frequency and ID Setting
A network ID is a separate digital channel on a single high frequency (HF) setting. Changing an ID
setting from the default “1” is useful when multiple systems are utilizing the same frequency.
To change the radio settings on your remote:
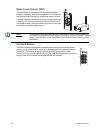
Step 1: With the remote power off, press and hold the [C] button.
Continue pressing it and power up the unit. The display
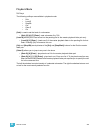
window will show the HF Channel selection screen.
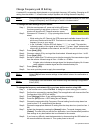
Step 2: Choose an HF Channel (1 - 12) by spinning either thumb
wheel.
• While setting the HF Channel, the RFR scans each available channel for traffic
which may interfere with the RFR. This feature is used to determine what
frequency to use in your venue.
• In the “Available:” field the RFR will display ***, **, * or “used”. The asterisks
indicate the quality of the signal at that channel. *** is best. “Used” indicates that
other traffic is detected on that channel, but the RFR may still function properly.
Step 3: Press {Next} ([S2]).
Step 4: Choose a network ID by moving either thumbwheel. Allowed range is from 1 to 99.
Step 5: Press {Next} ([S2]).
Step 6: Set the HF power level. This allows you to alter the strength of the transmission signal
from the remote. Allowed range is from +10 dBm to +18 dBm.
• A higher value indicates a stronger signal, but shortened battery life. A lower
value indicates a weaker signal and an extended battery life.
Step 7: Press {Save} ([S3]).
Step 8: You must cycle the power to apply the new settings.
To change the frequency and network ID in your base station receiver using USB:
Step 1: In the browser menu, select File<Exit. A dialog box opens asking you to confirm.
Step 2: Confirm this command by pressing {Yes}. The Ion application will close and the Eos
Configuration Utility (ECU) will display.
Step 3: Press {Settings} button. A new settings dialog box will display.
Step 4: Press the {RFR} button. A RFR dialog box will display.
Step 5: Choose the appropriate High Frequency Channel setting from the drop down box
(must be from 1-12, matched with the remote).
Step 6: Choose the appropriate Network ID setting from the drop down box (must be from 1-
99).
Step 7: Accept the changes by pressing the {Accept} button. To cancel changes press
{Cancel}. The next time you start the Ion application, Ion will automatically send the
new settings to any base station that is connected to the console.
Step 8: If you have any difficulty, reset the base station by disconnecting the USB cable from
the console and then reconnect it. This cycles power to the unit.
Note:
If you change the frequency and ID settings in the handheld remote you must also
change the frequency and ID settings to match in the base station.
Note:
Default [S4] will reset remote settings to their default values. No confirmation is
required.
Note:
Configuration over the network must be done using the Gateway Configuration
Editor (GCE).
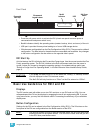
Setup: HF EUR
Set HF Channel
Available: **
1 (2.410 Ghz)
Next
Prev
Save
Default