


TELEDYNE API
Maintenance Schedule & Procedures M703E Calibrator Operators Manual
10.7. ADJUSTMENT OR REPLACEMENT OF OZONE
GENERATOR UV LAMP
This procedure details the steps for replacement and initial adjustment of the ozone generator lamp. If you are
adjusting an existing lamp, skip to Step 8.
1. Turn off the analyzer.
2. Remove the cover from the analyzer.
3. Locate the O
3
generator (see Figure 3-3).
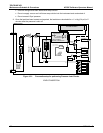
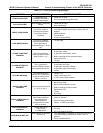
UV Lamp
Set Screws
O
3
Generator
Body
Lamp
O-ring
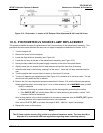
Figure 10-4: O
3
Generator Temperature Thermistor and DC Heater Locations
4. Remove the two setscrews on the top of the O
3
generator and gently pull out the old lamp.
5. Inspect the o-ring beneath the nut and replace if damaged.
6. Install the new lamp in O
3
generator housing.
Do not fully tighten the setscrews.
The lamp should be able to be rotated in the assembly by grasping the lamp cable.
7. Turn on analyzer and allow it to stabilize for at least 20 minutes.
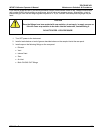
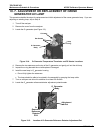
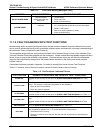
8. Locate the O
3
generator reference detector adjustment potentiometer.
A
djustment
Pot
O
3
Generator
Reference
Detector
PCA
O
3
Generator
Body
Figure 10-5: Location of O
3
Generator Reference Detector Adjustment Pot
174 05744 Rev B