


172 DOMINION SX USER GUIDE
RSC). The icon on status line will display Write Access (Lock) now, meaning now all users
can only view the port connection.
6. Log in the device connected to the port, and try interacting with the device using the RSC
panel.
7. Refer to: Get Write Access
section in Chapter 7 for details.
8. To relinquish write lock in the RSC window, select Emulator Æ Write Unlock, and the icon
on status line will display Write Access again, meaning any other privileged users will re-
gain Write Access now.
Case 4. Configuring LDAP
1. Purpose: To configure DSX to use LDAP/Active Directory server for login authentication.
2. After logging in SX via a web browser, select Setup Æ Remote Authentication.
3. If the LDAP server has a backup server, enter same parameters (except the IP address) for the
secondary LDAP server.
4. Click OK to commit changes.
5. Refer to: Configuring LDAP section in Chapter 6 for details.
Case 5. Creating Power Association Group
1. Purpose: To associate the target server with more than one power outlets physically
connected to it.
2. After logging in SX via a web browser, make sure a power strip has been configured
previously (To add a power strip: click Add on Setup Æ Power Strip Configuration page. See
Power Strip Configuration
section in Chapter 14 for details). Then, click Add on Setup Æ
Port Power Association List page.
3. Select the SX port connected to the dual-powered server device that you wish to associate
outlets with from the drop-down menu of Port, and enter a description for it, such as “Internal
Web Server Pronto” (see Port Power Association
section in Chapter 14 for details).
4. Select the Power Strip and outlet from the drop-down menu to match how the device is
connected to power. Then click on Add button and the information will appear in the text box
as “[Power Strip Name] \ [outlet 1]”. Select the same power strip and another outlet, then
press Add button to add it. Another line will display in the text box as “[Power Strip Name] \
[outlet 2]”. Click OK to commit the changes.
5. Click Add on Setup Æ Power Association Groups List page (See Power Association Groups
section for details).
6. Enter a group name and description, then the port ID from the “Available” box (multiple
selection is permitted), and click Add button to add to the “Selected” box.
7. Click OK to commit changes.
8. Refer to: Power Strip Configuration
section for details on how to add power strips to DSX
management first. If this wasn’t already done, refer to Port Power Associations
section to
map power strip outlet to a target server connected to a DSX serial port, and then refer to
Power Association Groups
section for details on how to group multiple power outlets
physically connected to that same target server.
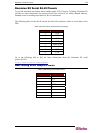
Case 6. Performing Factory Reset on DSX
1. Purpose: To set DSX configuration back to factory defaults through GUI.
2. Log in SX via a web browser with your login username and password, such as
(admin/raritan).