


14
15
not displayed until you select the letter.
When the keyboard is displayed you will see that
the entire current name of the scene is highligh-
ted. This allows you to immediately delete the
entire name. A new name can then be quickly
entered.
If you only want to change one letter within the
word, click on the letter just after the letter to
be changed or move the cursor (vertical bar) by
using the arrow buttons to the right of the scene
name. Press the delete key and then the key for
the new letter. You can insert new characters
into text in the same way. Simply click on the
character just after the desired insert position
and then type in the desired characters. Charac-
ters are inserted just before the cursor.
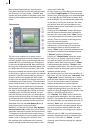
IN and OUT Points
These points are set to mark certain segments of
a scene. This can be a Trim procedure, but also
the placement of an Image Processing effect
in the storyboard (using the Range function).
When you click with the left trackball button on
"IN" or "OUT", the trackball function changes.
Rolling the trackball then causes the video to
scroll forward or backward through the video
scene with a speed depending on the speed the
ball is rotated. An additional click with the left
button sets the new beginning (IN) or end (OUT)
point. A click with the right button reinstates the
original setting.
The length of the scene is indicated as a 7 digit
code. 001.15:03 means that the material will run
for another 1 minute, 15 seconds, and 3 frames.
Scene check
These two buttons (see above) serve to quickly
review the rst and last few seconds of a scene
or audio segment. The "|>" button plays the rst
3 seconds starting from the IN point. The ">|"
button plays the 3 seconds just prior to the OUT
point.
Arrow buttons
Stepping through individual frames (see slider)
works by clicking on the ">" and "<" symbols.
Clicking on ">" moves forward to the next frame.
Clicking on "<" moves backward to the previous
frame. This behavior is found at several points
in the program, for example when trimming,
splitting, or using sliders within the effect lists.
Symbols for recording, playback, pause, stop
Several menus have buttons for recording, play-
back, pause, and stop, with which you can play
your video and audio material. You are probably
familiar with these functions on other devices,
such as your VCR.
This is the symbol for Record and can be found
in the recording menu. Clicking on it causes your
system to start recording, at which time you can
start your video input device. (For best results,
be sure to start the input device rst).
This is the symbol for Play. Clicking it will play
the video scenes or audio samples. In the recor-
ding menu it starts the DV input device.
This button causes a Pause in the playback. Cli-
cking on it again ends the pause and the video
material is played from the point at which the
pause was made.
The Stop symbol stops playback/recording. If
you initiate playback again, the video material
will be replayed from the beginning. Playback
can also be stopped by pressing the right track-
ball button. If you are using a DV input device,
then you can control it directly from the Record
screen. (But please be aware that most DV de-
vices are compatible, but some are not. If this is
the case, the DV device can be started manually
and should then input correctly.) In the recor-
ding menu you will also nd the three symbols
listed above: stop, playback, and pause, plus the
symbols rewind:
and forward: