


46
47
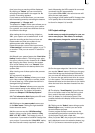
(4) In case you want to check your video material
and don't intend to change settings at the same
time, then you can use the button to reduce the
menu to a much smaller panel. In this reduced
menu only the buttons described under item (3)
and the button ("video settings" menu symbol)
to redisplay the entire menu are visible.
(5) Clicking on these menu symbols takes you to
the Recording menu or to the Main menu.
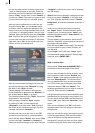
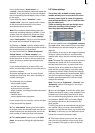
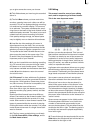
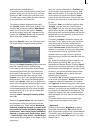
5.4 Recording
This screen is used to record your video footage
from your camera or deck onto the system.
(1) By clicking on the volume display button you
can call up a volume display on the opposite
screen edge which serves to adjust the decibel
(dB) level before or during recording (not
available in HDV projects). Try to set the level
as high as possible in order to achieve the best
audio quality, but do not overdrive it (stay out
of the red area!). You can change the level by
clicking on the dB slider below it. The sound
becomes quieter (up to –30 dB) or louder (up
to 20 dB), depending on whether you move the
slider toward the left or right.
Flashing blue or yellow means there are no
problems and ashing red represents overmod-
ulation. Clicking on the volume display button
again closes the volume display.
(2) Once you select the HDV format in the Project
Settings, there will be two, round record sym-
bols (one for HDV and one for DV):
If you set the "HDV recording" slider to "Only
HDV" in the System Settings, only one pass is
necessary. This activates one record button.
Click on this button to begin loading your HDV
footage into your system and automatically con-
vert the HDV stream into DV material. This takes
some time.
If you select "DV + HDV", two load passes are
required. You can see that this also activates the
DV record button.
Now you can output your video material via
HDV and record it using the HDV record button.
After that, switch the camera to DV and record
the DV video stream using the DV record button.
Please note that during the recording of source
HDV footage, neither picture nor sound can be
monitored. The screen displays a grey picture
with the running time.
Note that once the project settings are set to a
mode other than HDV, there will only be one
record button you can see.
During recording a click on the trackball right
button has the same effect as pressing the stop
button in the small display You can start and
stop recording to not waste drive space with
unwanted video. If you want to divide up your
recorded video material, after recording proceed
to the Edit screen. You can nd more informati-
on in section "5.5 Editing" under splitting.
(3) The selection button "Mode" offers you three
possibilities:
"Normal": means a normal recording.
The setting "Time" activates the "Time" slider
(see item (4)), with which you can set the recor-
ding duration exactly. After this time, recording
is automatically stopped.
The setting "Photo" is appropriate for single
icker-free pictures. Casablanca records about a
half second of material that is then extended as
a single image to the duration you have set (see
(4) "Time").
(4) The "Time" slider is activated by the modes
Time and Photo.
The Time mode allows setting the duration for
the still scene up to 100 minutes.
In Photo mode you can set the duration of the
still scene up to one minute.
You can always stop recording with the stop but-
ton, regardless of the time that has been set.
(5) When a new scene is recorded, the system
will automatically name it (S1, S2 etc.). Its name
is displayed under the record button. Clicking on
the name brings up the keyboard which allows