


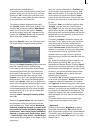

54
55
appears again.
You proceed in the same manner with the Out
point. You can carry out ne editing by using the
arrow keys (below the "IN" and "OUT" buttons)
to step through the individual frames one at a
time. You can play the trimmed scene to check it
by clicking on the Play symbol (all the way to the
right).
You can display the audio wave form and use
audio scrubbing (section 3.2).
This procedure simplies the creation of clean
splits.
Note: When trimming the IN-point, the system
always displays the rst available even eld.
When trimming the OUT-point, the system
shows the odd (later) eld.
When splitting, the rst eld is even, when
positioning, it’s an odd eld. This serves a more
clean way of cutting.
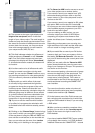
With the two buttons next to the time displays
for the start and end images you can play the
rst and last 3 seconds of the scene.
Note that segments of a scene removed by trim-
ming can be reinstated at any time by repeated
trimming.
To the right and below you can directly activa-
te the Edit screen and the Main menu with the
menu symbols.
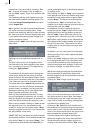
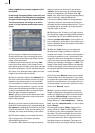
(22) You can delete a scene at any time. Clicking
on the "Delete" button deletes the currently se-
lected scene in the scene bin.
(23) In case you want to retrieve deleted scenes,
you can use the UnDo button (curved arrow) to
be found to the right of the "Delete" button. With
the UnDo button you can retrieve the last ten
most recently deleted scenes. Deleted scenes
are lost permanently when the system is re-
started, when switching between two projects,
and when there is no more space for recording
(video or audio).
This button can be used to reinstate scenes
that you deleted in the scene bin and now have
removed from the storyboard.
Tip: You can use the "Delete" and UnDo func-
tions to easily sort scenes in the scene bin. Dele-
te the active scene, activate another scene, and
then click on UnDo. The scene removed from the
scene bin is now reinserted just after the activa-
ted scene.
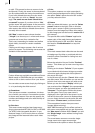
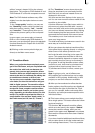
(24) As soon as you insert effects (which need
to be rendered) into the storyboard or activate
them in the "Special" menu, you'll see one dot
per effect in the upper right corner of the screen.
If the background rendering is activated, the
inserted effects will be rendered one after the
other. The dot of the currently rendered effect
ashes.
In the System Settings, you can determine if
rendering should start with the last placed effect
or if the effect is to be rendered at the end.
The rendering will be activated either with the
button "Smart Rendering" in the "System set-
tings" (see chapter 5.1, item (6)) or by clicking
onto this display in the upper right corner (as-
well as in other menus, which support inserting
effects), which also opens the window.
After rendering was started, you can continue
editing - the rendering will be done in the back-
ground.
The scene with the rendered special effect is
automatically placed right behind the original
scene in the scene bin.
Note: The display allows a maximum of 10 dots.
If there are more than 10 effects (which have to
be rendered) inserted, you'll see three little dots,
which means that further effects are waiting to
be rendered.
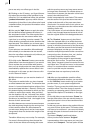
(25) To the right below you see six menu sym-
bols for the following menus: Recording, Tran-
sition effects, Image Processing effects, Titling,
Audio mix, and Main menu.
5.6 Finish
In the Finish menu a completely nished project
is recorded out to a DV or video recorder. If your
system is provided with a DVD writer and the
software "DVD-Arabesk", you can record your
nished video to DVD (to read more, go to chap-
ter 5.6 in the "Smart Edit - 2nd edition" manual
or in the separate manual that is included with
"DVD-Arabesk".)
You can nish creating all video and audio.