


36
37
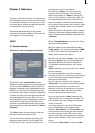
select "Create". The system computes the audio
tracks affected by the commentary. When the
calculation is nished, replay the storyboard
(Play symbol to the right of the scroll bar).
Pay close attention to the volumes of commen-
tary, original sound, and background music in
relation to each other. It is highly likely that there
is a mismatch. Often the commentary is not loud
enough and is masked by the background mu-
sic. You can now match the volumes to obtain
the proper audio relationship.
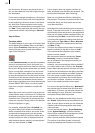
At the moment the audio in the commentary
track is selected. The "Volume" slider applies
to the entire length of the highlighted audio
sample. You can set the volume lower (negative
dB values) or higher (positive dB values). After
creation you can immediately check the result.
Within the audio track you also see the volume
displayed as a 2-tone-blue wave form.
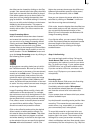
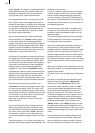
It will often be necessary to lower the volume of
the background music and/or the original audio
in order to hear the commentary sample. Here
you want to correct the volume of the "neighbo-
ring tracks" for the duration of the highlighted
sample. Click on the commentary sample to
highlight it. Then click the "Correction" button
and select the camera symbol (representing the
original audio track) from the list. Now use the
dB slider to the right (NOT the Volume slider
above) to correct the original audio track's volu-
me for the duration of the commentary sample.
Next select the musical-note symbol in the
"Correction" list and use the control to the right
to lower the volume by 10 dB. The music volu-
me is lowered by 10 dB during the commentary
sample, and and when the sample ends--so does
its correction to the other tracks. They will then
return to their original volume levels.
Use these controls until you have found your
ideal audio mix.
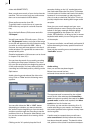
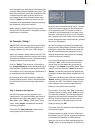
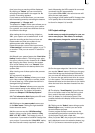
If you would like the volume change not to be
abrupt, but gradual so that it sounds as if you
are controlling the change by hand with an au-
dio mixer, click on the button "Fade" (while the
commentary is active). In the following menu
you see two possible settings, Fade-in and Fade-
out.
Two sliders appear, i.e. for fade-in and fade-out,
together with several default values between 1/2
second and 10 seconds.
A fade-in value zero seconds means an abrupt
volume change. A value of one second means
that all volume changes take place gradually
over the course of one second. This applies to
the volume of the affected track (in this case the
commentary track) and also to its correction of
all neighboring tracks.
Set the values for both fade-in and fade-out to
one second. This achieves an smooth volume
transition. After the renewed creation you can
check the result.
The rst commentary sample is now complete.
Find the position for the second commentary
and repeat the above procedure.
After all commentaries have been mixed, you
set the volume of the original audio and the
background music. Select the rst piece of back-
ground music in the storyboard and play it. In
case the original audio cannot be heard and the
background music is too loud, you can adjust
the volumes using the volume control. You have
already learned earlier in this chapter how to do
this.
With audio mixing it is even possible to remove
disturbing sounds, for example coughing on the
original source audio.
The wave form is the suitable tool for this purpo-
se.
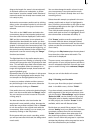
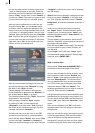
Left-click on the desired audio sample to high-
light it in blue, then select the "Wave Form"
menu item. In the "Wave Form" dialog, rst
insert three anchor points by means of "Add"
in the volume display beneath the wave form.
Then activate the leftmost of the three new
points by clicking on it. The colour of the acti-
vated point changes from red to green. You can
now change its position, either by clicking on
it again and then dragging it with the trackball
to the desired position, or by clicking on the
"Range" button. If the "Range" function is used,
the associated video frame is displayed in the
background, and the position of the point can be
determined according to its location within the
video.
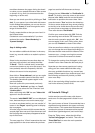
Place the rst point horizontally ahead of the
unwanted noise to be eliminated, without ho-
wever modifying its vertical position. Position
the second point horizontally in the middle of