


48
49
the end ("Start" button).
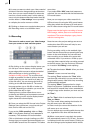
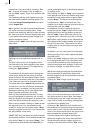
To do this, you have to select “Position”. Now
you can see the background scene. To trim the
insert-scene either from the front or from be-
hind, switch the selection button to “Trim” so
that you can see the “IN” and “OUT” buttons.
During this setting, you can see the background
scene. Set the selection button to “Trim E” so
that you can see the insert-scene instead.
The so-called “background scene”, in other
words the story board, can be split in three
parts:
1. the background scene before the insert
2. the Insert scene
3. the rest of the background scene after the
insert
This division allows you to place any number
of insert sequences onto a single background
scene.
Inserts are indicated in the storyboard by a sym-
bol (two overlapping rectangles) in the upper
part of the scene in the storyboard and can be
Removed at any time.
The button "Remove" offers the possibility to de-
lete the rst and the last part of the background
scene in front of or behind the insert scene.
Overlapped background sequences are auto-
matically put back together.
Neighboured insert scenes can certainly be con-
nected with a transition effect.
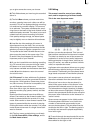
(13) After you have added an insert and the
scene is still selected in the storyboard, you
can use the "Range" button to modify inserted
scenes.
These scenes can either be shifted (Set the
mode to "Position”, and then click "Start”.) The
Insert scene can also be re-trimmed at the begin-
ning or at the end (using the "IN/OUT" buttons
in Trim mode). The function “Trim E” allows you
to see the insert-scene while trimming.
For Insert scenes the user is brought to the usual
Range menu. Here also you can display and hide
the audio wave form with the loudspeaker sym-
bols (section 3.2).
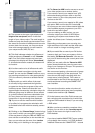
If you click on the "Range" button while no insert
scene is activated, you can reach every position
of the activated scene or of the entire story-
board. This function is helpful if you have added
a very long scene to the storyboard and want
to view its middle position. You can reach the
desired position by the help of the button "Posi-
tion" or with the arrow buttons – the slider to the
right shows the current position in relation to
the complete storyboard. The position can also
be changed by clicking the play button; the stop
button stops playback. If you exit the "Range"
menu by clicking on "Ok", the new position is
conrmed.
(14) Scenes are added to the storyboard from
the scene bin. The selected scene in the scene
bin is added to the storyboard by clicking the
"Add" button.
The added scene always appears after the cur-
rently selected scene in the storyboard.
There is one exception. When the very rst
scene is the current scene in the storyboard, the
user is asked by the system whether the scene
to add should be put In front or Behind the rst
scene.
There also exists the possibility to cancel.
If you add the scene before the rst scene then
you will be asked – if there is audio on a music
track – whether the music track should be shifted
backward. Answering Yes causes all audio tracks
to be shifted, No causes the music tracks 1 and
2 (thus the sound tracks 3 and 4) to stay at their
time position, and this causes them to slip under
another previous scene.
When the scene has been inserted, the original
in the scene bin can be deleted or trimmed wit-
hout affecting the storyboard scene.
(15) The function "Remove" deletes the scene
located in the center of the storyboard from the
storyboard. An "Insert" scene can also deleted,
and this uncovers the background. If you have
already created audio and the scene to be dele-
ted is affected, then you will receive a warning
message telling you that an audio sample will
be deleted.
(16) Clicking on "Replace" causes the selected
scene in the center of the storyboard to be re-
placed by the active scene in the scene bin.
This can be a completely different scene, or the
same scene with different In and Out points.
(17) The "Search" button makes it possible to
nd the same scene in the scene bin that is
currently selected in the storyboard (assuming
it has not been deleted or renamed). After
clicking on "Search" the scene in the scene bin
is activated and can, for example, be trimmed