


28
29
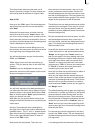
the rst scene). All scenes are played in the or-
der you have dened, from left to right through
the storyboard.
If you want to change the sequence, (for examp-
le move a scene from the end of the storyboard
to the beginning), select the scene in the Scene
bin. Now click in the storyboard on the scene
after which the selected scene is to appear. Click
on "Add". Finally, select the old scene in the sto-
ryboard and remove it by clicking on "Remove".
Step 5: Effects
Transition effects
The basic footage of your video is nished. Now
some effects can be added. Return to the Main
menu. Select Transitions. Alternatively, you can
simply click the menu symbol at the bottom
right of the Edit menu:
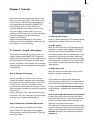
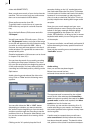
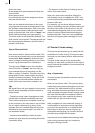
In the Transitions screen you see the storyboard
above in its usual place, but in the center you
now nd the active scene area now has room for
two scenes. Bring the two scenes that you would
like to connect with a transition into the center.
Click on the Play button below the storyboard
to play the last second of the rst scene and the
rst second of the second scene so that you can
observe the hard cut between the two scenes.
Now select a transition to be placed between the
scenes. SMART EDIT offers you many possibi-
lities from a simple crossfade to complex 3D
effects.
Below left in the menu you nd a list of the indi-
vidual effects, where a maximum of 7 effects are
displayed at one time in the list; use the slider to
access the rest. Every effect is represented by a
name and a symbol. Simply click on the desired
effect to highlight it in gray.
For example, select the effect "Crossfade" (or
any other effect, if this effect is not available),
which causes the rst scene in the center of the
storyboard to change gently into the second.
In this case the effect is a real-time effect, so its
symbol, outlined in blue, is displayed immedi-
ately between the two scenes in the storyboard
after you have clicked on "Add".
If your system does not support real-time ef-
fects, all effects must therefore be rendered. The
blue symbol will appear after rendering.
Now you can check the effect by clicking the
Play symbol. This plays one second of the video
before the effect, the effect itself, and one se-
cond after the effect.
Now select the next transition point in the story-
board. To do this click on the ">" arrow button or
click directly on the next scene in the storyboard.
Now you can select another transition effect, (for
example the effect Bars). In the eld to the right
you have three options to change how this tran-
sition performs: Type (Move or Over), Direction
(6 different directions, represented by arrows),
and Bars (2-200).
This time the effect symbol placed in the story-
board is outlined in red after a click on "Add".
This means that the effect has to be created
before it can be viewed.
We recommend that you activate the "Smart
Rendering" function, so that added effects
can be rendered in the background while you
continue to work.
However, you can preview the effect to decide if
you really want to use it. Click on the "Preview"
button below the storyboard. A screen will open
in which one second before the effect, the effect
itself, and one second after the effect is played.
For a few of the complex effects, the preview
may wobble a bit, because the number frames
per second is reduced. However, this will not
occur in the actual transition once created.
For some of the special effects (e.g. "Backward")
the preview may be slower than the nal calcu-
lated effect. Of course, you can also choose the
other settings for type, direction, and number,
and observe these with the preview.
When you are satised with the effect, click on
the "Create" button below the storyboard to the
right. A screen opens so that you can follow the
creation (with a blue progress bar and actual
video preview).
You can activate the option „Smart Rendering“
in the „System Settings“. Now the inserted
effect will be rendered in the background, while
it is possible to insert more effects.
After a few seconds the effect has been created.
The outline of the effect symbol in the story-
board now appears blue instead of red. Now