


50
51
or split. (This cannot be done to a scene in the
storyboard). Finally, the scene in the storyboard
can be replaced with the newly trimmed scene.
If you have deleted the scene from the scene
bin, then after you click on "Search" the mes-
sage "The scene was not found. Should it be
re-created?" appears. If you then click on "Yes"
and the scene will again appear in the scene bin.
This function can be activated at any time, even
after restart, after which a deleted scene cannot
normally be re-created.
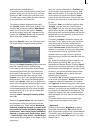
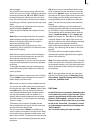
(18) "New" creates a scene whose duration
("Length") can be set up to 1 minute and whose
contents can be set from a selection list.
This is very interesting for leaders and trailers
(black video), but also for certain crossfade
effects.
Clicking on this button causes a list of various
options to appear. The following new scenes are
available in the standard version:
Further effects are available on additional Smart-
Media cards or CDs/DVDs that you can obtain
either as full or demo versions from your dealer.
You can select a new scene simply by clicking on
it or by activating the slider control.
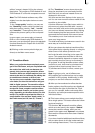
a) Countdown
This new scene creates a countdown, the dura-
tion of which you can set. A countdown number
is shown each second. You can also specify the
numbers and background color with the help of
the color box.
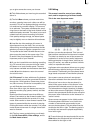
b) Color bars
This scene creates a striped test image accor-
ding to the standard IRE 100 (for PAL) or IRE 92.5
(for NTSC) with changeable duration. In pro-
fessional usage, it is normal to have a colorbar
test image several seconds before each video
project.
c) Color
This option creates a one-color scene that is
mainly used as background for titling. Selecting
the option "Color" opens the color box so that
you may select the color.
d) Pattern
After you select this button, you see the "Select
pattern" button to the right. Click on this but-
ton to open a screen in which you can select a
pattern from the Image Pool. More information
on this image pool can be found in section 3.3 of
this manual.
The special effect called "Pattern" applies the
aspect ratio of the used pictures and patterns
to the 16:9 format (in PAL and HDV). Activate
the function "Enable distortion" to stop this
correction.
e) Black
This mode creates black video that can be used
as background for titles or combined with the
transition effect Crossfade for fading into and
out of a video.
Below the selection list you nd the "Preview"
button. This allows you to view a moving video
preview.
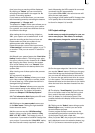
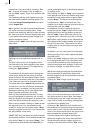
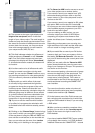
Clicking on the button "Full size" (if your system
is provided with this button) brings up another
menu that again displays the effect options in
the area to the right.
In the left area you see the "Frame" slider under
the effect name. With this slider you can set the
point in time in the new scene you wish to see.
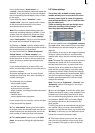
Below you see the button "Display" which you
use to select either "Original" (the representation
of the new scene you have just selected) and
"Compare". The last option divides the screen
into two parts. Part of your new scene is
displayed in the right half of the screen. In the
left half of the screen a scene is displayed that
you can freely choose from the scene bin with
the button "Choose scene" positioned below.
This comparison function lets you correct
images (adjust coloring).
With "OK" the settings for the effect options in
this menu are accepted and you are returned to
the "New scene" window. With "Cancel" you exit
the "Single image" menu without having made
any changes.
The arrow button serves to move the single-
image menu to the upper screen edge.
You also have the option to reduce the panel