


20
21
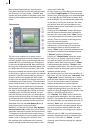
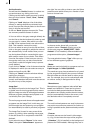
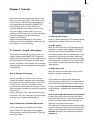
You can customize the settings for your
mask still further by using the “Brightness”,
“Contrast” and “Color” buttons that are located
in the bottom area of the window.
For simple, soft shifts, it is recommended that
you use the “Linear H” (horizontal shift), “Linear
V” (vertical shift) and “Linear D” (diagonal shift).
The direction of the color shift can be altered
using the “Mode” button.
The little box next to the "Colorize” button can
be used to activate or deactivate the colorization
of the pattern displayed in the upper preview
window. If a dash appears in the little box,
you can see the original color. If a check mark
is shown, you can see the pattern with the
colorization that you set. You do not have to
activate the check mark in order to colorize
a pattern – all you need do is click on the
“Colorize” button!
With "Mode" you can choose from eight diffe-
rent positive and negative inverses.
To select a color, you can access the color box
directly using the little color box in the bottom
left corner of the right-hand image pool area (on
the left next to "Ok"). If, for example, you click
on the "Color/Pattern" button when selecting a
border for the titles, you will rst of all see the
image pool in which you can either select (using
the button described here) a mask or a color as
desired.
The pattern chosen, with its chosen settings (e.g.
direction, color), can be saved and used again at
a later stage. For this purpose, use the “Archi-
ves” button. Included, you’ll nd a number of
pre-set examples (“Granite dark”, “Wood”,…).
Below this window you nd the buttons "Co-
lor" (the color box can be accessed from many
masks) and
Demo software
Most supplemental programs can be installed as
demo versions. This means that you can let your
dealer transfer these versions to your SmartMe-
dia card or CD/DVD, so they can be previewed at
your leisure. To do this, insert the SmartMedia
card or CD/DVD and click on the button "Install
Product" in the System Settings screen. Select
as accustomed the program in the list and click
on "Display".
The selected software is then activated as demo
version, as you can tell by the caption "(Demo)”.
You can use this program without restriction, i.e.
you can insert effects, calculate them and view
them, but each effect is superimposed with the
red text "Demo". To purchase a code to unlock
the supplemental program, please contact your
Dealer.
3.3 Working with Graphics Tablets
You also have the option of connecting an
Intuos graphics tablet or, if your system has a
VGA port, a VGA tablet.
Further information on available and supported
tablets can be obtained from your dealer.
You can nd out how to connect and calibrate
both tablets below. For further steps on
operating your tablet, please refer to the
instructions that came with it.
3.3.1 Intuos tablet
Connecting
Plug in the cable of the graphics tablet into an
available USB port on the back of your machine,
which can remain switched on when you plug in
the cable.
Calibration
In order to be able to control the SMART EDIT
user interface precisely, you must rst calibrate
the graphics tablet before using it for the rst
time.
To do this, enter the “System Settings” and click
onto the “Calibrate Graphics Tablet” button.
A menu appears, displaying the name of the
connected tablet.
You can now set the “Pressure Sensitivity” of
the tablet’s pen. A higher value means that you
have to press harder to reach an effect. Push the
slider to the entire right (“Off”) to deactivate the
pen point totally – instead you will have to press
the lower positioned button on the side of the
pen itself (see Intuos manual for more details).
The "max. Distance" button allows you to