


26
27
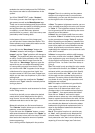
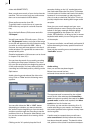
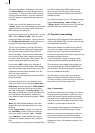
Trim screen. In the background you see the rst
frame of your video. The trim panel is in the
foreground and covers one third of the picture.
The name of the scene appears in the upper line,
and next to that its length is displayed. For this
tutorial a time between 3 and 10 seconds is sui-
table. (If the currently selected scene is shorter
than that, exit the Trim screen and select ano-
ther scene. If it is longer, trim the scene down to
10 seconds)
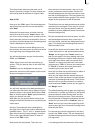
Now trim the In point, (the point at which the
scene will begin playing). Clicking on "IN"
replaces the displayed panel with a narrower
one, in which you can scroll with the trackball
and adjust the In point. Rolling the ball to the
right causes the scene to be shortened from the
beginning. Rolling to the left increases it again.
Clicking the left trackball button conrms your
setting and you are returned to the Trim menu.
There you can make a frame-by-frame adjust-
ment using the arrow keys "<" and ">" located
below the "IN" button.
You can adjust the Out point by clicking on
"OUT" and proceeding as explained above. Rol-
ling to the left shortens the scene from the end
and rolling to the right increases it again. The
arrow keys located below the "OUT" button are
also available for frame-by-frame adjustment.
At the top of the Trim panel you see the new
scene length next to its name. The time infor-
mation for the rst frame is displayed next to
the "IN" button – 000.00:14 means, for example,
that the scene has been shortened by fourteen
frames. The time information for the last frame
appears next to the "OUT" button.
Click on the right button to leave the Trim menu.
Select the next scene and trim it as explained
above. Continue until all scenes have been trim-
med.
You should now have a series of scenes in the
scene bin that are all free of bad properties (e.g.
blurred video, bad frames, scene breaks, etc.)
and each last from 3 to 10 seconds.
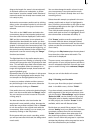
The Storyboard
Now the scenes are ready to be put into proper
sequence. SMART EDIT lets you sequentiallly
order the scenes in the storyboard. It doesn‘t
matter in what order they appear in the Scene
Bin.
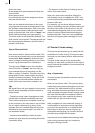
Select the scene in the Scene Bin that you want
to be the rst scene in your video project. Click
on "Add" (in the upper screen area, below the
storyboard itself). The scene then appears in the
horizontal panel (the storyboard) directly in the
center.
The storyboard contains the nished video pro-
ject (which right now only consists of 1 scene).
Of course, changes can be made to the story-
board at any time.
Now select the second scene and click again on
"Add". You are asked whether the scene should
be added before or after the scene in the story-
board. This question appears only when the rst
scene is the active scene in the storyboard (in
the center, with its length displayed above).
Normally, SMART EDIT will add a scene after the
active scene in the Storyboard. The query in this
case makes it possible to insert a scene in front
of the rst scene. For now, select "behind".
Now you already have two scenes in the story-
board. Add the rest of the scenes in this manner.
When you are nished, all the scenes that make
up your video should be in the storyboard.
In the scene bin every scene that has been ad-
ded to the storyboard is indicated with a white
point in the upper right corner.
Now you can view the nished video in its
"rough draft” version. First you must make the
rst scene in the storyboard the active scene.
There are four ways to do this:
(1) Click with the left button on the arrow button
"|<" beneath the storyboard. The rst scene of
the project is now the active scene in the center
of the storyboard.
(2) The slider under the storyboard is used to
scroll through the Storyboard scenes (using the
trackball). Move the slider all the way to the left.
(3) Using the "<" button you can move one scene
at a time toward the rst scene.
(4) You can also click directly on the desired
scene, causing it to be put in the center.
Clicking on the Play symbol below the story-
board to the left causes the video to play from
the beginning of the active scene (in this case,