


32
33
After the calculation is nished you may click
on "Choose Range" so that the Range menu is
opened and – in case you don‘t want to record
out the entire storyboard – you can use the IN
and OUT buttons to specify the segment to be
recorded.
Finally, click on the Play button next to the
"Analog" button. You are requested to switch the
video recorder to recording mode. Clicking on
"Ok" activates recording out.
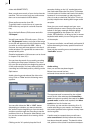
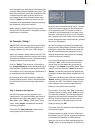
If you want to record out to a DV device, choose
"DV" next to "Record to VCR”. After you have
created all effects (see above) – click on the but-
ton "DV Recorder Controls" causing the corres-
ponding DV operating panel to appear.
The top row of buttons control the DV device,
the lower Play button makes the Prestige start
playing your video project and start the DV
device recording. Now select the desired posi-
tion on the DV tape before starting recording
out with a click on the lower "Play" button. No
picture is displayed while recording out!
If you select "HDV" output (only available if
you have created an HDV project), the footage
must be rendered again (see above), even if the
effects have already been rendered in for DV.
This may take some time.
In the end, you can output the material just like
with DV projects.
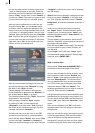
Of course, you can burn your nished video
directly to DVD if you are using a system with
DVD writer. Select the program "DVD Arabesk"
in the list in the lower-left screen and click to
the right on the option "Launch program". You
then enter the DVD menu whose operation you
can read about in the separate manual you
have obtained after buying the program "DVD
Arabesk".
Note: The DVD-Arabesk software may differ
slightly from the description below on some
systems.
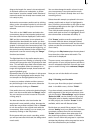
In the “Image quality” section, you may see
the “Rendering” button, which provides you
with three options, namely, “fast”, “normal”
and “intensive”. These options allow you to
inuence the picture quality of the computed
lm.
In some cases you cannot play an inserted DVD
or a lm created using DVD Arabesk. In that
case, you can therefore ignore the playback
functions described in Chapter 3.2 of the DVD
Arabesk manual.
So, this short tutorial is over. The examples that
follow, "Insert editing", "Audio mixing", and
"Titling 1 and 2", will explore some of the things
that we have only mentioned up to now.
4.2 Tutorial 2: Insert editing
Now that you have become familiar with basic
editing with SMART EDIT, you can continue with
more specialized tutorials.
What is the essence of modern music videos?
You hear a complete musical composition from
beginning to end. The camera is sometimes
focussed on the artist, but at other times you see
completely different scenes.
The same situation occurs for lectures, inter-
views, speeches at wedding celebrations, etc.
The exercises in this chapter assume that you
are somewhat familiar with the SMART EDIT
user interface. The instructions given are there-
fore not as detailed as before.
You will create a music video such as those
shown by various television music channels.
The main function you will be using is Insert-edi-
ting, which you will learn about here.
Step 1: Preparations
At rst you require the raw footage. You need a
fairly long scene, preferably a continuous one,
where the music is always synchronized with
the artist‘s lips. A singer friend of yours lmed
with a camcorder will sufce. A television news
speaker or commentator will also do.
The complete raw footage (your "background")
should ideally be 30 seconds long or longer.
Now you need some scenes that you will over-
lay onto the background with Insert-editing.
Such scenes can contain much more than the
background video, (for example a sunset, a car
race, etc.).