


48
49
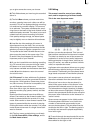
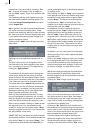
(3) The buttons next to the slider can be used to
move from one scene to the next in the story-
board one scene at a time.
(4) The buttons "|<" and ">|" move you to the
beginning or end of the storyboard.
(5) You can use the Play button to the right of
the slider to play the storyboard beginning with
the selected scene until the end of the story-
board (or until you stop playing either by pres-
sing the Stop button which is now visible, or by
clicking the right trackball button.)
You also have a Pause button which you can use
to stop the playback until you press the Pause
button again (or press the Play button). The last
frame appearing before the Pause button was
pressed remains as a single picture on the moni-
tor until playback is resumed.
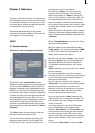
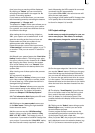
(6) Clicking on the "i" button, a window is called
up showing information about the storyboard.
You’ll see the project name, the current position
of the storyboard (the time is displayed), the
length of the whole storyboard and the remain-
ing length (after the current position).
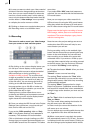
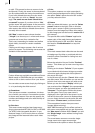
(7) Recorded scenes appear automatically in
the Scene bin in the lower section of the screen.
They are represented as small thumbnails (the
rst frame of the video scene). In video mode
(not VGA) up to eleven scenes can be viewed
simultaneously in the Scene bin. For more than
eleven, the slider (item (8)) is then used to scroll
to the desired scene. Scenes from the scene bin
that have been inserted into the storyboard are
indicated by a small white point in the upper
right corner of the scene.
In the scene bin (right), you can see the project
name you chose.
(8) The slider below the scene bin is used to se-
lect the scenes to be displayed. The buttons next
to the slider can also be used to move through
the Scene bin one scene at a time.
The buttons "|<" and ">|" are used to jump to the
beginning or the end of the scene bin. The "<"
and ">" buttons will move through the scene bin
one scene at a time.
(9) The Playback button is to the right of the sto-
ryboard slider. This button is used to playback
the scene displayed in the center of the scene
bin.
Stop and Pause buttons are also available.
(10) Clicking on this "i" button displays a window
showing information about the activated scene
in the scene bin. In the upper part of this win-
dow you’ll see the timecode, the recording date,
the recording time and the format.
Further, you can call up the keyboard by click-
ing on "Enter/change comment" in order to
add your notes to this scene, which then will be
displayed in the lower box.
Clicking on "Ok" conrms the notes, so that it
will be displayed in this information window
when it is called up again.
(11) In case you have not yet renamed the sce-
nes in the Record screen, you again have the
chance here to give the scenes your own names.
Simply select the desired scene in the scene
bin and then click on this button to bring up the
on-screen keyboard. If you have the PowerKey
option, then you can use this keyboard to clear
the old name and enter a new name.
(12) Many users require "overlapping" of cer-
tain video sequences with other scenes without
changing the original audio. Example: a music
video (see Chapter 4, Tutorial 2). A complete
recording of the singer is available. Certain porti-
ons of this recording are to be substituted with
other scenes, but the view of the artist singing
is to reappear several times. The movement of
the singer's lips should always be synchronized
with the music. This means that the original
audio does not change, even though scenes are
changed.
SMART EDIT offers an easy way to do this: With
an Insert-edit, the selected scene in the scene
bin is overlaid onto the storyboard. Only the
video, not the audio of the scene is overlaid.
Clicking on "Insert" overlays the selected scene
in the storyboard with the selected scene from
the scene bin. The scene in the storyboard (back-
ground) is then partially or completely covered
with the insert scene (foreground). The back-
ground scene must, of course, be longer than
the foreground scene.
The range (start position, length) can be set free-
ly and changed at any time, even after the Insert
is placed. Every click on "Insert" leads automati-
cally to a Range menu.
The starting point, which is by default set to the
rst frame of the insert, can be moved towards