


41
Chapter 5: Reference
This part of the manual serves as a reference to
the individual menus. Look here for information
on individual functions or menu items you may
be unsure about, as well as additional features
not explained in earlier tutorials.
Please note that depending on the system
model, the functions explained in this text may
vary slightly or may be missing.
VIDEO
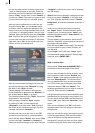
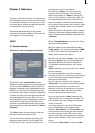
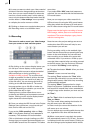
5.1 System settings
This menu is used to make general settings.
(1) Clicking on the "Install Product" button
displays a window that gives you three options.
You can use the "activate" function to activate
software contained on the SmartMedia card or
CD/DVD. You do this by rst selecting the desi-
red software, after which a window is displayed
in which you then enter (through the keyboard)
the code obtained from your dealer. The pro-
duct is displayed in the corresponding selection
menu and can now be used. Software demo
versions are installed by activating the product
without entering a code (see section 3.2 "Demo
Software").
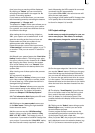
The "Hide" button prevents display of the pro-
duct and thus also prevents its use.
You can activate the software by telling your
dealer the serial number of your system (be-
low left in this menu, item 9) so that you can
purchase the code for the software.
By clicking on "delete", you can remove the
program which is activated in the list above.
After having clicked on "delete" a warning ap-
pears. If you conrm it by clicking on "yes", the
corresponding software will be removed. It is
certainly possible to install it anew afterwards.
As an example this function can be used in order
to delete demo software which is not required
any longer.
Another function in this window is the "i" button.
Clicking on this button displays additional infor-
mation on the selected software (see section 3.2
"i buttons").
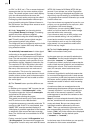
(2) The "Trackball Speed" can be set here. There
are three possible speeds.
(3) If your system is provided with the button
"video output", you can choose between "CVBS"
or "YC". If your video recorder supports a YC
signal, please choose this option.
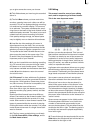
(4) Click onto the button "Screen". Here, rst set
the option "Screen". You can choose between
Video and different VGA screen resolutions.
The available modes depend on your system
model.
Video means that you can use your TV to access
the user interface.
The other possibilities are used to connect a
computer monitor to be used as a second screen
or as an alternative screen (depends again on
the system model used).
You can read more on this in the chapter 6 :
"VGA mode". The system is automatically restar-
ted after being switched to another mode.
After this, you have 15 seconds time to conrm
the request with "Yes", otherwise the system
reverts to the previously used mode.
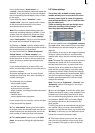
Once you have made a "Video" selection, the
buttons below will no longer be selectable. The
user interface and video footage are displayed
on the TV monitor.
If you have opted for one of the VGA modes,
you can (depending on the system) select
between "One monitor" and "Two monitor" use.
A one monitor set-up shows the user-interface
and video footage on the VGA screen, in two
monitor mode, the user interface and video foot-
age are split: Interface in VGA, video on the TV
screen.
If you use the "One monitor" mode, the "VGA