


30
31
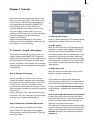
ding to the length of a scene in the storyboard).
A red band means over-modulation, a yellow
band means "must be created" and a blue band
means the audio has already been created, and
it is ready to play.
Activate the commentary audio track by clicking
either on the microphone symbol or on the track
itself. The track turns from gray to blue when
selected.
Then click on the "Add" button and select the
commentary that you have spoken and named
from the audio list now displayed. Conrm with
"OK" and the commentary is now placed as a
light/dark blue band below the scene you have
selected in the storyboard, on the track you desi-
gnated, (in this case, the commentary track). The
audio sample will be placed at the beginning of
the scene currently selected in the middle of the
storyboard. It can be moved using the "Range”
function (see below).
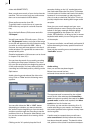
The light/dark blue in the audio sample repre-
sents its volume level. Raising or lowering of the
volume will change the ratio of light blue to dark
blue. This will also show fade-ins and fade-outs,
once they are added. (When the sample is no
longer the highlighted sample, these bands will
appear light/dark gray.)
Remember that all of the functions in this screen
affect only the highlighted audio sample. Only
one sample can be highlighted at any time.
In case you made a mistake and the commen-
tary should begin in the next scene, delete the
audio sample by clicking on "Remove".
If the audio does not yet have the desired length,
then it can be corrected with the "Range" button.
You can read more on this in tutorial 4.3 (audio
mixing, step 3).
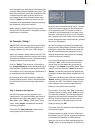
You also see that the color band under the
storyboard is now partially yellow, because the
audio has not yet been created. Click on "Create"
to mix the audio on the original track with the
commentary. After creation you can check your
results by clicking on the Play button.
Do the same with your music recording, which
you will put onto the third track (the background
music track).
You can also change the audio volume in case
your commentary is too quiet and the music
too loud, (if you haven't already done so in the
recording menu).
Select the audio sample you placed in the com-
mentary audio track so that it is highlighted in
blue. Scroll the volume slider to the right so that
the displayed dB value to the right is increased.
Increase about 5 dB.
Then click the audio sample on the background
music audio track so that it is highlighted. Scroll
the volume slider to decrease the dB by –5.
Click "Create" and the overall soundtrack will
be created. With the above changes nished,
the commentary becomes louder and the music
quieter so that the commentary can be heard
more clearly.
Clicking on the Play button plays the storyboard
from the active video scene with audio. The
audio level is displayed.
There are many more options in ne-tuning the
audio portion of your project but they will be co-
vered in subsequent tutorials. You can also read
more on audio mixing in the reference (Chapter
5).
Now you can exit the Audio mix screen.
Step 7: Finishing your rst video
So, now your rst video project is almost ni-
shed. In the Main menu, click on "Finish".
If you have already created all the effects and
audio segments in the various submenus, then
only the function "Choose Range" and the button
"Record to VCR" can be clicked in a DV project.
Otherwise (also in already rendered effects of
an HDV project), the function "Create" is also
available, which we will discuss below.
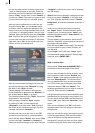
Decide how you would like to output. If you
choose "Analog" and your effects have not been
completely created, then click on the button
"Create" and the system then takes care of all
the remaining necessary creation of effects/
audio. You can follow the progress in a preview
window that displays a blue progress bar and a
list of the effects as they are created.