


78
79
The method of volume control employed in
each case is therefore determined primarily by
the task concerned:
• If the volume of a complete audio sample
is simply to be increased or reduced, direct
volume control is the solution. Using the wave
form for this purpose would be to use a sledge-
hammer to crack a nut.
• If an audio sample is to be dampened whilst
another audio sample is playing, for examp-
le the background music is to be softened for
the duration of a commentary, indirect volume
control is the most convenient solution. Mo-
difying the audio samples by means of the wave
form or splitting the music manually would also
entail a disproportionate amount of work.
• If unwanted noises are to be eliminated from
a audio sample or over-modulated passages of
an audio sample adjusted to the general volu-
me level, the wave form represents a powerful
tool, albeit one which is not particularly easy
to use. Once an audio sample has been edited
by means of the Wave Form function, indirect
volume control is however subject to certain
limitations.
5. Fading audio samples in and out.
To fade specic audio samples in and out gently,
click on the sample concerned to highlight it in
blue. Now click on Fade to call up a dialog in
which you can bind fading in and out to specic
images, either by selecting a predened time
value, or by clicking on and moving the approp-
riate fader.
6. Adding audio effects.
Audio effects (standard effects, surround effect,
supplementary effects) can be added to individu-
al audio samples in the same way as to comple-
te sound tracks.
• To add an audio effect to an individual audio
sample, rst select the desired sample, high-
lighting it in blue. Then click on Effects and se-
lect an effect from the list. If necessary, adjust
the effect. Then conrm your selection with
Insert/Change. A small fx at the right-hand end
of the audio sample concerned now indicates
the presence of an audio effect in the overview
of all sound tracks.
• To add an audio effect throughout a comple-
te sound track, i.e. to all audio samples of a
sound track, click on the fx symbol on the left
of the sound track concerned. Select an effect
from the list presented. Make any effect adjus-
tments required, then conrm your selection
with Insert/Change. A white point on the left-
hand button indicates the presence of one or
more effects in the sound track concerned.
• To delete an audio effect again from a sound
track or an audio sample, call up the audio ef-
fect menu again (as described above) and click
on Remove. Remove functions irrespective of
the effect selected, leaving an effect-free audio
sample or effect-free sound track.
7. Checking audio mixing.
• Add the remaining audio samples in turn and
adjust the volume, fading and effects as required.
• To check an individual audio sample in detail,
rst select the desired audio sample, then
click on the Timeline menu item. The timeline
display shows all audio tracks in relation to the
selected audio sample. You can use the scroll-
bar beneath the timeline display to move the
displayed passage, click to move the sound
track to a different audio sample, and call up
the functions Fade and Envelop from within the
timeline display.
8. Creating audio.
Create the sound. The colour control bar imme-
diately beneath the storyboard should no longer
contain any yellow components.
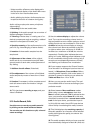
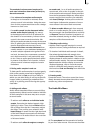
The Audio-Mix Menu
(1) The storyboard and its operation is familiar
to you from other menus. You can use the slider