


24
25
Step 4: Recording and editing
Recording
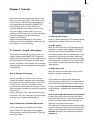
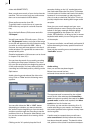
Now select "Record" to enter the Record screen.
In the background you will see your video. An
operating panel in the foreground displays (after
the recording is stopped) the name of the scene,
the recording time, and the approximate remai-
ning time available on the hard drive.
If you have connected a DV device for input
through the i-Link interface (if your system is
provided with this interface), then you can use
the ve buttons in the lower part of the opera-
ting panel for DV control. Note that not every DV
device is compatible, but you will nd that most
are.
Seen from left to right on the DV control panel,
you can: stop playing the DV tape, play the DV
tape, pause, rewind, and fast forward.
Rewind and fast forward each have three diffe-
rent modes. Fast rewind or fast forward results
if the button is pressed while the recorder is
stopped. Viewable slow rewind or slow forward
results if the button is pressed while DV unit is
playing. Clicking the button while the DV unit is
in pause mode moves a single frame backward
or forward.
The selection button "Mode" (if supported)
offers three options in a DV project, but for this
exercise leave it set to "Normal".
If you are editing an HDV project, set the "Mode"
accordingly so that only one recording is made.
Only one HDV recording button will be active.
With the button in the lower-left corner (arrows
facing each other) you have the option to move
the panel to the lower screen edge . With the
button on top of that you can reduce the panel
size to the functions for reinstating the larger
panel (the Record menu symbol) and for moving
the panel.
The four menu symbols in the lower right corner
take you to the Edit, Record/Edit, Video settings,
and to the Main menu screens.
Now wait until an scene you wish to load is
reached. Clicking the record symbol causes the
Prestige to begin recording.
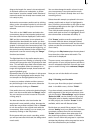
As soon as recording begins, the current panel
is replaced with a smaller one that displays only
the elapsed recording time and a stop symbol.
You can see that your system is actually recor-
ding because of the changing recording time.
Now record a few minutes of video, preferably
containing 4 or 5 different scenes. Then press
the stop symbol. Your rst recording is now
stored on the hard drive.
If you are recording an HDV project, the HDV
video footage will be loaded into your system
once you have clicked onto the record button. It
will be automatically converted from HDV to DV
format. Of course, in parallel, the HDV material
is saved and edited in the background. This
takes some time.
Now record a few more scenes. Do this as
described above. The recorded scenes are at
rst automatically titled with "S 1", "S 2", etc. To
change the name (e.g. to "vacation") click on this
eld immediately after recording to bring up the
keyboard where you can enter your text.
Stop the input device and then exit the "Record"
menu.
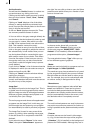
Editing
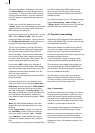
Now go to the Edit screen. Here you see the
Scene Bin in the lower half of the screen. The
Scene Bin contains a sequence of small pictures
("thumbnails") showing your recorded scenes.
To the right and above the scenes, you can see
the name of your project – if it has been named.
All created individual scenes that are ready for
editing are stored in this bin. You can see up
to eleven entire scenes at one glance in video
mode. For more you must scroll the horizontal
slider below the scene bin to access following
scenes.
You can also use the arrow buttons next to the
slider to step through the scenes forward or
backward one by one, or to jump to the begin-
ning or end of the scene bin.
In case you have not already renamed the sce-
nes in the "Record" menu, then you again have
the chance here to give the scenes your own
names. To do this, position the desired scene in
the center of the panel so that is displayed larger
than the rest and the length of the scene can be
seen displayed directly above it. (Scroll through
the scene bin or click directly on the desired
scene so that it is moved directly to the middle
"selected" position.)