


32
33
Trim these Insert scenes so that each one is
about 5 seconds in length. For three inserts you
will need at least 30 seconds of original video.
Step 2: Edit
Now go to the "Edit" menu. Put the background
scene from the scene bin into the storyboard
with "Add".
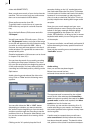
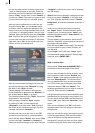
Select the rst short scene to insert from the
scene bin and click on the "Insert" button. You
are now in a time-setting menu in which you can
freely place the pictures (not the audio) of the in-
sert scene onto the background (the background
video is displayed on the screen)
This menu is the same as the Range menu. At
the moment, the insert scene is positioned at the
very beginning of the background scene.
You will see that there are two functions here,
"Trim" and "Position".
"Trim" allows you to trim the scene being In-
serted. (This can also be done in the main Edit
screen).
"Position" lets you designate the start point
where the Insert scene will appear in the overall
30-second background scene.
You will let 3 seconds of the background scene
run before the rst insert scene appears. Set the
selection button in the panel above-left to "Posi-
tion" so that the option "Start" appears below it,
which you should now click.
With Start you can specify which frame of the
background will be the rst to be overlaid by the
Insert scene.
Scroll to 3 seconds (the time is displayed to
the right in the menu) and conrm with the left
trackball button. The "<” and ">” buttons below
Start allow frame-by-frame changes, if needed.
Click on the right trackball button in order to
return to the "Edit" menu.
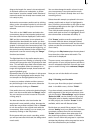
Now look at the storyboard. There are now
three scenes in the storyboard – the one in the
center contains an Insert symbol. First the 2-3
seconds background, then the insert scene, then
the rest of the background. The insert scene has
been marked with the Insert symbol. The overall
length of the storyboard is still 30 seconds.
This division into two background scenes (which
would become one again if you were to remove
the insert scene from the storyboard) makes it
possible to overlay additional insert scenes onto
the same background.
Play the storyboard from the rst scene. You will
see the background scene, then a hard cut to
the insert scene, and then the background scene
again. The audio from the background scene is
heard the entire time.
Now shift the Insert scene forward a little. Click
on the Insert scene in the storyboard and select
"Range" (to the right of the "Insert" button) so
that you are again in the time-setting menu and
the background scene is visible. Notice that you
once again have three modes to choose from:
"Position" to change its placement in the back-
ground scene, "Trim” to shorten the Insert scene
or "Trim E" to shorten the insert scene while
monitoring the insert scene itself.
Now click on Start and scroll forward (to about 4
seconds). You can now exit the menu.
Now you can begin with the second insert pro-
cedure. Click on the last scene in the storyboard
(last part of the background scene). Then click in
the scene bin on the second scene you wish to
insert and select "Insert" so that you are again in
the "Range" menu.
The default starting point is again the beginning
of the scene. If you do not Position it, the second
insert would then follow directly after the rst.
But this is not what you want. There should be
several seconds of background between the two
inserts. So you now click on "Position" then on
"Start" and now you move the beginning of the
insert to the right; 3 to 4 seconds is enough time.
Now exit the menu.
Five scenes can now be recognized in the story-
board in the "Edit" screen. The two inserts have
divided the background scene into the following
ve segments:
1. the background scene before the rst insert