


72
73
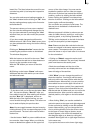
• Video transition effects are also displayed in
the Storyboard display of the Audio-Mix menu
in the form of an intermediate scene.
• Audio splitting by the bar. Audio samples can
be split at the touch of a button during play.
Audio mixing employs the same principle as
video editing:
1. Recording of the raw (audio) data.
2. Splitting of the audio sample into a number of
discrete passages (if desired).
3. Trimming of these data, i.e. cutting out of un-
desired components such as coughing, residual
material from adjacent CD tracks, etc.
4. Special processing of the audio sample or of a
part of it (e.g. interchanging of stereo tracks).
5. Insertion of these audio samples into the
storyboard.
6. Adjustment of the volume of the original
audio and of any commentaries and the back-
ground music to each other, and adjustment of
any fading.
7. Addition of audio effects (if desired).
8. Fine adjustment of the volume of individual
audio samples by means of wave form (if desi-
red).
9. Creation (if necessary) of the complete sound
track (all stereo tracks are mixed on a single
stereo track).
10. This just leaves recording to tape, and your
video is nished.
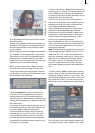
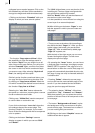
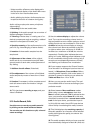
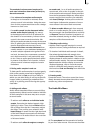
5.10 Audio Record, Edit.
Use this menu to record your audio material
by clicking on the round red Record button.
You can also use this function to split, trim and
name recordings.
(1) Use the volume display to adjust the volume
level. Try to set the recording volume level as
high as possible so as to obtain optimum sound
quality, but do not over-modulate it. Click on the
scrollbar below the volume display to change
the volume level. Move the scrollbar to the left
or right to reduce (to a minimum of -30 dB) or
increase (to a maximum of 20 dB) the volume
respectively. Flashing blue indicates that ever-
ything is in order, ashing yellow indicates a risk
of over-modulation during audio mixing (only if
several over-modulated segments are mixed),
and ashing red indicates over-modulation.
(2) If your system supports the "Sound" button,
it can be used if an analogue input has been se-
lected, i.e. Microphone, Front and Rear. Before
recording audio material, click on the button. A
window is opened in which you can select the
Treble and Bass from -12 to 12 dB.
(3) Here you can see the audio input. The opti-
ons available differ of course according to your
particular model.
(4) Select between Mono and Stereo modes.
When using a mono microphone, check that
Mono is actually selected. If DV is selected as the
input, you can also select Stereo B. In this case,
the sound is recorded from a second stereo audio
track of the input device, provided the input is
in 12-bit, 32 kHz mode. Not all DV input devices
offer a facility for selecting this mode, however.
(5) This eld displays the remaining capacity of
the audio partition as a function of the selected
quality (the higher the quality, the shorter the
running time).
(6) The audio samples which you have recorded
are automatically assigned a label (A 1, A 2, etc)