


91
Chapter 8: HD Backup-System
8.1 What is a backup used for?
Some hardware variants support the backup
functionality:
In addition to the exchangeable system hard
drive, the system is supplied with an integrated
hard drive, found in the inside of the unit.
This backup hard drive allows you to save your
current project. It offers the same capacity as
your system hard drive.
You can also make use of the HD Backup-System
on other systems by upgrading your system.
Further information can be obtained from your
dealer or MacroSystem.
A backup can be helpful to save the edited mate-
rial from time to time in order to avoid a pos-
sible loss of data, in case of a damaged system
hard drive (e.g. during transport).
The backup drive is also helpful if you wish to
do some “experiments“ with some effects and
would like to get back to the former version of
your project back afterwards.
Another way to use the backup system is to
save your data in order to exchange the full
(complete) system hard drive with a bigger one,
to copy the saved material onto it and continue
working with it again (exchanging a hard drive is
explained in the hardware manual).
You can make a copy of your footage in order to
create two variations of a lm (e.g. with different
endings).
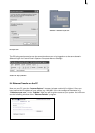
8.2 Starting the backup
If you want to do a backup of your video foot-
age, please touch the “Backup“ button (if avail-
able) at the front of the unit softly. This issues a
warning from the user interface - conrm it.
(This warning may appear in any menu you are
working in.)
On other systems with a backup option, which
may however not feature the front button, enter
the “System settings” menu and click on the
“Hard-drive backup” button.
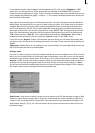
A selection dialog then appears. In this dialog,
click on the ”Backup” function. A dialog is then
displayed showing information on your source
and target (backup) drives. Click on ”Begin back-
up”. The application asks you whether the last
backup should be overwritten. Answer by clicking
on ”Yes”. The system then begins copying your
data from the system drive to the backup drive,
and displays a progress bar showing the estimat-
ed remaining time.
Important: Should you click on ”Cancel”, the
backup currently in progress will be aborted
and the video material on the backup drive will
remain incomplete. As soon as the backup has
been completed, the progress bar is cleared and
the information menu called up once again. Click
on ”Quick” to return to ”System settings”.
The saved material now remains on the backup
drive until you overwrite it again. You can now
replace the defective or full system drive with a
new drive.
You do not need to wipe or reinstall the system
drive in order to transfer data back to it. The
material present on the backup drive automatically
overwrites the data on the system drive.
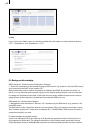
Click once more on the ”Hard-drive backup”
button in the ”System settings” menu. After
conrming the ”Restore” prompt, you will be
presented with a dialog showing information on
your source (backup) and target drives. Click on
”Begin restore”. The system begins copying the
data you have saved on the backup drive to your
(new) system drive. A progress bar showing the
estimated remaining time is displayed.
Important: clicking on the ”Cancel” button causes
the active restore operation to be aborted. In this
case you must completely re-install your system
software. As soon as the restore operation
is complete, the progress bar closes and the
information menu is called up. Click on ”Quick”
to return to ”System settings”. Following a
successful restore operation, you can record and
edit further material. It goes without saying that
this also restores access to all scenes and effects.
Important: During backup and restoring of your
video material, only data actually occupying space
on the hard drive are copied. Unneeded copies
are not therefore made of empty drive space. This
reduces the time required for copying.