


23
Chapter 4: Tutorials
We recommend working through the ve tuto-
rials in the order given here. This offers you an
introduction to video editing followed by the
more specialized techniques of SMART EDIT
(insert editing, audio mixing, titling, etc.).
For these tutorials we assume you are using
only one monitor (video mode). If you are
working in VGA mode, then you can read about
eventual changes to the user interface in
chapter 6: VGA Mode.
Please note that depending on the system
model, the functions explained in this text may
vary slightly or may be missing.
4.1 Tutorial 1: A small video project
This example introduces you to the basic con-
cepts of editing with SMART EDIT. Special ap-
plications and procedures are not explained yet.
In this example you will create a simple video
project. A "project" is the creation of a complete
video starting with raw footage and ending with
a nished lm.
Step 1: Selecting raw footage
For this example you will use your own raw
footage. Set aside a cassette with raw footage
(e.g. video from your last vacation), be it in DV
or HDV format. You will only need a few sce-
nes that last a total of about 3 minutes. Try and
select interesting material so that the project will
be more fun!
Put the cassette in your video input device (e.g.
camcorder, VCR, etc.) and rewind it to the positi-
on where your selected footage begins.
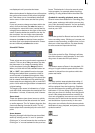
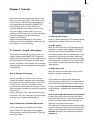
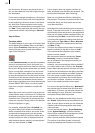
Step 2: Orientation in the Main Menu screen
Turn on the machine and wait until the hard
drive is ready. The Main Menu now appears
offering several options for selection. There are
three main areas:
(1) Settings (above right)
Here you select settings such as trackball speed,
desired audio quality, or the current project.
(2) Video (center)
Here you will record your raw footage onto the
hard drive and then divide (split) it into editab-
le scenes. You will then edit (trim) the scenes
and nally put them into a new sequence in the
storyboard. You will put transition effects bet-
ween the individual scenes and apply an Image
Processing effect (or lter) to one of the scenes.
You will then create a title and then nish your
video project.
(3) Audio (below left)
Here you score your video with music, sound
effects or spoken commentary.
This division into logical steps makes for a
clearly structured work plan. If you should have
any questions during the course of work, then
simply check the Reference Section(Chapter 5)
of this manual – all buttons are explained there
in detail.
How do you access the individual work screens?
Position the screen cursor onto the correspon-
ding eld. Then click on it with the left trackball
button. The right trackball button cancels, or
returns you to the previous screen.
This operation requires a certain familiarity with
the user interface. If these instructions are unfa-
miliar to you, please read about the trackball in
section 2.2 and then the operating elements in
section 3.2.