


46
47
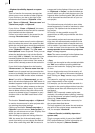
you to give scenes the name you choose.
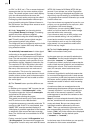
(6) This elds shows you how long the recorded
scene is.
(7) The eld Rem. shows you how much time
remains, meaning how much video can still be
recorded. This is not displayed during recording;
it is switched to a smaller display. This amount
is an estimate. The system calculates the remai-
ning time on the basis of the level of detail of the
material already recorded. The value is not recal-
culated until the current recording is nished.
If the quality settings change, the actual space
may be slightly more or less than this estimate.
(8) Just like the video settings, this menu is
superimposed over the video. You can see the
video during recording and thus always decide
whether you want to digitize a sequence or not.
The symbol at the lower left with the two trian-
gles moves the panel to the upper edge. This
is useful if the panel happens to be covering
important parts of your material.
(9) If you don't need this menu during recording
(e.g. DV control) then you can minimize it with
this button to a much smaller panel. Then the
only buttons available are the buttons described
under (8) and the button to return the normal
size record menu.
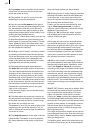
(10) "DV control" is done with these ve buttons.
You can directly control the connected DV device
through the i-Link interface. Please note, howe-
ver, that not every DV device is compatible, but
you will nd that most of them are.
Seen from left to right, the buttons are used to:
stop the recorder, play, pause, rewind, and fast
forward.
Rewind and fast forward have three different
effects. Fast rewind or fast forward results if the
button is pressed while the recorder is in stop
mode. Slow rewind or slow forward results if the
button is pressed while the recorder is playing.
Clicking the button while the recorder is in pause
mode causes movement of a single frame back-
ward or forward.
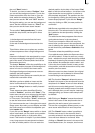
(11) The four menu symbols bring you directly
to the Edit, Record/Edit, Video settings, and to
the Main menu screens.
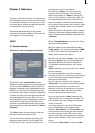
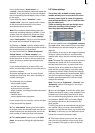
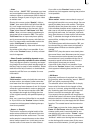
5.5 Editing
This screen is used for most of your editing
work, and for sequencing of trimmed scenes.
This is the most important menu.
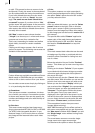
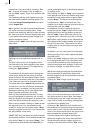
(1) Here you see the storyboard. This is a tool
that has been used since movies were invented.
The idea is to clearly lay out all the scenes of a
production in order to more easily implement
editing principles. A single frame, (the rst pic-
tures of a scene), are used as symbols ("thumb-
nails") to represent the scene.
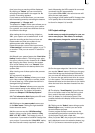
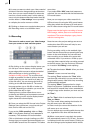
A glimpse at the storyboard allows you to grasp
the whole story without having to review all of
the material. Traditionally, the storyboard was a
large board composed of hand-drawn pictures.
Your system uses an electronic storyboard.
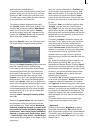
Scenes are selected from the scene bin (item
(7)) and put into order on the storyboard, lo-
cated in the upper section of the screen. In the
storyboard the selected scene is in the center.
The selected scene length (duration) is display-
ed above the scene to highlight it. Clicking on a
scene in the storyboard causes it to be moved to
the center (often referred to as the "selected" or
"active" scene).
Seven scenes can appear in the visible portion
of the storyboard. But there is no limit to the
number of scenes that may actually be pre-
sent on the storyboard. The storyboard can be
scrolled to the left or right. The starting point is
to the left, and scenes are played sequentially
from left to right.
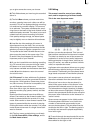
(2) To scroll through the storyboard click on the
slider below the storyboard and roll the ball on
the trackball to the right or left.