


38
39
transitions between the pages. Using the durati-
on value you can extend the text to other scenes
or shorten it (e.g. limit it to one second at the
beginning or at the end).
Now you can check your title by clicking on "Full
size", if your system is provided with this button.
In the window that appears you can use the con-
trol next to "Frame" to scroll through the entire
range of the title effect.
Finally, create the title so that you can view it in
the nished video.
Calculation occurs automatically if you have
activated the option "Smart Rendering" in
"System Settings".
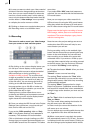
Step 3: Adding credits
You can add an additional title later in the story-
board, e.g. as end credits or to explain a picture
scene.
Select in the storyboard a scene that does not
yet have a title symbol, and select the effect
"V-Scroll". This is a vertical scroll, (a text that
moves from bottom to top over the screen). You
have probably seen this frequently. Add this
effect to the scene in the storyboard.
Now click on "Enter/edit text" and you are again
in the main operation panel of the titler menu.
The doubly spaced text appears again in the
preview window.
Now call up the title you entered previously
by clicking on "Archives" and then on "Load",
after which you select the Text "Exercise" (see
"Archive titles").
After conrming with "OK" the text "Video title"
appears in the text window.
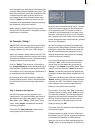
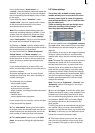
The words "with SMART EDIT" are not displayed
here, because they are not on the same page.
In order to see these entries, you can use the ">"
button in the "Pages" operating panel to display
the next pages.
A further page for the scroll title means that the
second page does not scroll into the screen until
the rst page has completey disappeared at the
top of the screen.
The next page for a V-Scroll means that the next
page appears on the screen when the previous
page has scrolled off the screen at the top.
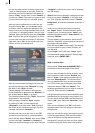
Change the text "Video title" to "End Credits V-
Scroll". To do this, move the cursor to the end of
the text (after "title") and click on the left track-
ball button to position the cursor there. Now
press the button "Text" and then the delete key
of the on-screen keyboard (long arrow pointing
to the left, to be found above the new-line key)
as many times as necessary to delete the text.
Then enter the text "End Credits".
Conrm your entered text with "OK". Exit the
text entering menu with the "TE" button and
then the main operation panel with „Ok“. You
are now again in the main Titling menu. Now
you can use "Preview" to observe the effect.
If the text scrolls too slowly or too quickly, then
you can change the scroll speed accordingly. In
this case the text must travel the distance from
bottom to top – a longer running time means
more time for this and movement is slower.
To change the running time click again on the
duration value. Now create the title and play it.
Now that you have some experience in using
titling you can create additional titles using
the many available functions (e.g. several text
panels, different panel sizes, textured type). And
the following exercise will provide you with
even more help.
(All of the remaining titling functions are explai-
ned in the reference, section 5.10.)
4.5 Tutorial 5: Titling 2
In this exercise you will create a title that ex-
tends over ve text pages and is faded in and
out.
You need a scene of about 15 seconds that has a
signicant border between the upper and lower
screen halves. (This means that the bottom half
contains the events of interest and the top half
should be a light background, such as the sky).
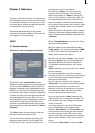
Enter the Titling menu, select the title effect
"In/Out Fading pages" and add it. Then click on
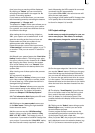
"Enter/Edit Text" to enter the main operation
panel of the titler.