


68
69
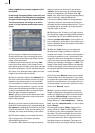
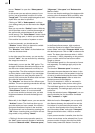
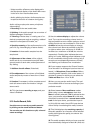
"Alignment", "Line space" and "Delete active
line" are listed.
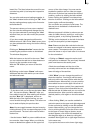
You can see that the settings of the buttons with
percent values lie between 50% and 200%, whe-
reby 100% corresponds to the default setting.
In the Enter/edit text screen, click anywhere
in the line of text to be edited. Then select the
button "Line” and under "Character width" enter
the desired percent. Click on "OK" to observe the
result. The letters have become wider (> 100%)
or narrower (< 100%), depending on the percent
given, and the entire line has become either
longer or shorter.
The individual words in a line cannot be format-
ted separately. The settings apply only to the
entire line.
The function "Character space" increases or
decreases the space between the letters. In the
Enter/edit text screen, click anywhere in the line
of text to be edited and select the button "Line”.
Use the "Character space" slider to enter the
desired percent of the distance.
The line is stretched (> 100%) or narrowed (<
100%), depending on the percent value given.
The individual words in a line cannot be format-
ted separately. The settings apply only to the
entire line.
Under the selection button "Alignment" you can
specify whether the line should be formatted
"left", "centered" or "right".
With the function "Line space" you can specify
the distance between the selected line and the
line below it. In the Enter/edit text screen, click
on the line that lies above the line to be chan-
ged. Now select "Line” and under "Line space"
change the default value (=100%) to another
value.
If your percent number is smaller, then the line
below moves closer to the selected line. If your
percent number is larger, then the line slides
farther away toward the bottom from the se-
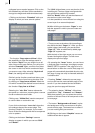
box or “Pattern” to open the “Select pattern”
screen.
In this screen you can select a pattern of your
choice, just as described in section 3.2 under
"Image pool". The mode (positive/negative) and
alpha value can also be specied.
Clicking on "OK" in "Select pattern" conrms
your settings and you are returned to the "Style"
menu.
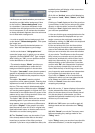
Now you can see the “Outline” button. With the
aid of the slider next to it, dene the strength of
the outline with values between 0 (not active)
and 6 (strong). The “Color/Pattern” button leads
you to the image pool, in which you can decide
if the outline is to consist of a pattern or color.
In the box beneath, you should see the
“Shadow” button. Use it to determine a width
between even values of 0 to 20.
The “Direction” and “Color” of the shadow can
now also be determined.
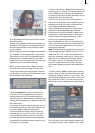
In the right area of the screen, you can see the
function “Italic”. You can activate it by selecting
the empty box next to it.
Underneath, you can see the “3D” option. The
strength of the three-dimensional effect can be
set with even values between 0 and 20 by mo-
ving the slider. The effect makes the letter look
as if they had a certain depth. If you use higher
values, make sure to set a character space of
around 120% so that the 3D effect does not inter-
fere with the letters themselves.
The “direction” can be set to four different pos-
sibilities. The arrow pointing towards the left top
direction is recommended.
The structure of the effect can be set using the
“Color/Pattern” button. It is recommended
to use a tone similar to the text color, yet with
brightness between this and the background
color’s.
Below left, in the "Style" screen, you can see the
“Archives” button. The Archives allow you to
save the styles you have created. You will also
nd some examples of styles in the archives.
The Style screen can be closed by pressing the
“OK” button (meaning that you conrm the set-
tings made) or by pressing “Cancel”.
• Clicking in the text entry operation panel on
the "Line” button opens a window in which the
functions "Character width", "Character space",