


18
19
tended to be used as background for DVD titles,
the pictures can also be used elsewhere in the
system.
You'll nd "SMART EDIT" under “Product“.
From here, you can also nd logos of the sin-
gle systems as well as the MacroSystem logo.
These can be used as background pictures when
creating your own text panel in the titling screen
and are therefore very useful for credits.
In addition, you will nd many pictures
provided here (e.g. stars) – they have many uses
particularly when creating titles.
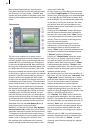
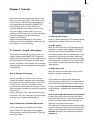
In the bottom left corner of the image pool
you will see the i-button described earlier. This
button allows you to access information on the
currently selected "Product”.
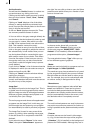
If you click on the "Save Image” button, the
“Product” selection will change to “Custom
Images” and the “Type” selection will change to
“Images”. The system will also ask you to select
an entry. Conrm this notication with “Ok”
and select a free (black) image from the list.
Then click on “Save Image” again to open the
scene bin so you can select the starting frame
of a scene that you want from the bin. After
you conrm with “Ok” it appears in the image
collection and in a large preview (right). You
can store a total of 18 of your own images here,
which you can later use anywhere in your video
editing work.
You can of course also readjust the “Product”
selection and “Type” selection manually before
saving a picture.
All patterns can also be used as texture for fonts
in the Titling menu.
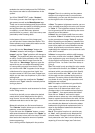
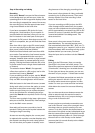
In the list to the left you can select the desired
mask, which is then displayed to the right in
large format. You can also see the names of the
selected mask above and to the right.
Below this window you nd several buttons:
The “Colorize“ button allows you to colorize all
patterns - even colored ones.
If you click onto the “Colorize” button, a menu
with several buttons will appear. Use “Mode” to
select how many colors are to be used. This will
then lead to the respective amount of palette
buttons appearing.
Your coloring will be displayed in the preview
window.
Original: There is no coloring and the pattern
remains in its original color or monochrome.
Additionally, you can use this function to return
to the original color of the pattern.
1 Color: The pattern brightness remains; yet one
color is added according to the color you choose
in “Color 1”. The brightness chosen in the color
box is ignored as this is controlled by the mono-
chrome part of the pattern.
2 Colors: You can create a shift from one color
to another. "Color 1" is added in the parts used
by the monochrome image. "Color 3" replaces
white. Depending on the pattern, instead of the
black and white parts, the most bright and dark
parts of the pattern are used. Between the two
colors, all previously monochrome tones are
replaced by the respective color tones and a soft
color shift is created.
3 Colors: In comparison with the shift between
two colors, a third color is added: “Color 2”. This
color replaces the gray tone found in the middle
of the original monochrome shift. The result is a
shift from Color 1 to Color 2 and from there, to
Color 3.
Tint: This mode is only provided for color masks.
If you select this function, the "Color 1” button is
activated, which you should then click. Specify
a color and conrm with “Ok”. All the colors
of the mask are then replaced by the one you
selected. The entire picture is then lled with
one shade of color, though the saturation and
brightness are retained.
Hue: This option is likewise only provided for
color masks. If you click on this button, the
system rst of all determines which is the
dominant color in the mask and then displays
it as “Color 1”. You cannot select this button.
Now click on “Color 2” and use the upper
palette arrow to select any color shade that you
want to replace the dominant color with. All the
colors in this mask are thus replaced with a new
one, whereby the distance in the color palette
between the original and replacement color is
equal to the distance between the dominant
color and Color 2.
Hue 2: This option functions in a similar way
to “Hue”, and is therefore only displayed for
colored masks. Though in this case you can
freely select the color that is to be replaced by
capturing it from the image (see Color box).