


76
77
which title in the list has already been selected.
If you cancel the operation while the titles
are being read, then all titles that have been
successfully read are displayed in the list.
The window “CD Import” closes automatically
after the audio titles have been read and you
then see the titles displayed in the list of sound
clips.
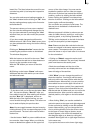
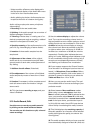
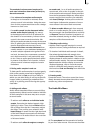
(16) Here, you can see a CD symbol. Click on
this button and a screen called "CD compilation"
appears. This screen allows you to select
samples for your audio CD. You could burn your
audio comments or extracted original sounds to
CD or even load a music CD and re-burn it with a
different track order.
On the left you can see a list with sound samples
("All samples"). Select the desired sample and
press "Add". The sample should now appear
in the right list ("Selected samples"). This way,
you can continue adding sounds to your CD.
Any samples selected from the left list are
highlighted with a little dot.
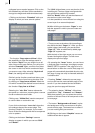
Take care not to overstep the maximum length
of 72 minutes for the CD. The "Estimated usage"
of the CD can be monitored on the top of the
screen. Of course, you can remove any tracks
from the list again by simply pressing "Remove".
Once you have nished assembling the list
of tracks for your CD, press "Ok" and insert
an empty CD into the disc tray. A CD-RW, the
system can optionally delete the contents rst,
before the tracks are burned. Please wait with
removing the CD until the system tells you the
CD was burned successfully.
(17) Click on one of the menu symbols to access
the menus Edit, Audio-Mix and the main menu
directly from this menu.
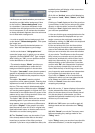
5.11 Audio-Mix
Use this function to arrange recorded com-
mentaries and the background sound in the
storyboard, add audio effects, and ne-tune the
volume for the sound tracks.
Audio mixing is similar in principle to video
editing.
The storyboard with the scenes and video ef-
fects which you have added to it is visible at the
top of the screen. Unlike the storyboard view
of the Edit menu, transition effects are however
displayed as discrete scenes in the storyboard.
This display mode is advantageous, as it enab-
les other audio samples to be situated exactly
within the duration of the effect.
Below the storyboard are several horizontal
bands, the sound tracks.
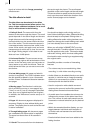
If you have set the control “Audio tracks” to
“normal” in “Project settings” under “Audio
settings”, the specic differences between the
sound tracks are as follows:
Audio samples from the original sound track,
the commentary track and the effect track(s) are
bound to the scene(s) above them. Where chan-
ges are subsequently made to scenes before
and after the audio samples, the sample remains
synchronized with its previous position. Where
changes are made to scenes which overlap the
audio sample in time, the latter must be deleted
(following a prompt). Audio samples in the mu-
sic tracks are not bound to a scene; instead, they
retain their position in relation to the starting
point of the storyboard. Changes to the video
before or during the audio sample result in shifts
which are, however, generally uncritical in the
case of background music etc.
Owing to this difference in behaviour, the tracks
bound to the video material are particularly
suitable for commentaries or for sound effect
dubbing.
The music track is intended for background mu-
sic and similar audio. Provided the differences
between tracks are observed, it can of course be
used for any other purpose.
If you set the control "Audio tracks" (in "Project
Setttings") to "Selection", then you can freely
specify the behavior of each soundtrack (except
the original soundtrack).
In the audio editing menu the symbols next
to the soundtracks change into numbers and
arrows, indicating to you the setting for each
soundtrack.
The following procedure must be followed for
audio mixing:
1. Add audio samples to a sound track
• Select the desired sound track by activating the
symbol to the right of the track or by clicking