


30
31
video with SMART EDIT").
Next, record some music of your choice into the
machine. This can come from any audio source
than can be connected via RCA cables.
Direct audio conversion from CD.
To quickly load in music from a cd, open the
DVD writer tray and put in a cd and close the
tray.
Go to the Audio Record, Edit screen and click
"CD Import" .
You will now see the CD Audio menu. Click on
the "CD Contents" button, and a list of the songs
on the CD will appear to the left. Select the song
you wish to convert and click "OK". After a
moment, the song will now appear in the list of
audio samples. It is a good idea to rename the
sample at this point.
(Detailed explanation of this screen can be found
in chapter 5.10, item (15).)
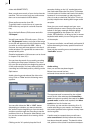
You can hear the result of your audio recording
by clicking the Play button. With the Trim func-
tion you can set precisely the beginning and end
of the audio sample. You may wish to split the
recording into individual parts by clicking on the
Split button.
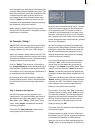
Audio trimming works almost like video trim-
ming. Click on "Trim" and the following menu
appears:
You can click either the "IN" or "OUT" button
(depending on whether you want to shorten
the audio from the beginning or from the end)
and then scroll through the recording to set the
position of the In or Out point. Alternatively, you
can use the arrow buttons for trimming frame-
by-frame.
Clicking on the "|>" symbol plays the rst 3
seconds, clicking on the ">|" symbol plays the
last 3 seconds before the Out point. This makes
it much easier to nd the exact end of the audio,
because it is not necessary to play the entire
piece in order to check the Out point. This is es-
pecially helpful when dealing with longer audio
samples.
Now give your music sample and your com-
mentary sample a name. Simply click to the left
below on the gray rectangle with the default
name suggested by the system (A1, A2, CD
Audio, CD Audio2 etc.) to bring up the on-screen
keyboard with which you can change the name
of the sample.
To prevent confusion, we will wait until tutorial 3
before discussing the many special functions of
this screen.
Now exit the recording menu and switch to the
"Audio Mix" screen.
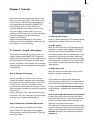
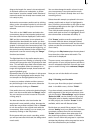
Audio mixing
Here you see the storyboard again.
Below it are several horizon-
tal bands: these are the audio tracks.
The topmost track is reserved for the original
sound of the video whereas the Commentary
track (microphone symbol), the track(s) for back-
ground music (musical note symbol) and effect
track(s) are free for further use.
Of course, you can use the remaining 5 (or 2)
tracks according to your needs – the names of
the tracks /symbols to the right are merely inten-
ded as a guide.
If audio must be created, then you will see a
color control band (directly below the scenes,
but above the audio tracks). The band is either
red, yellow or blue (sized in sections correspon-