


70
71
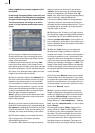
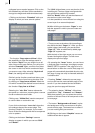
a diagonal arrow symbol appears. Click on the
left trackball key and then roll the trackball to
change box height and width simultaneously.
• Clicking on the button “Extended” calls up a
display in which you have several options:
- The function "Copy style to all lines" offers
the possibility to copy the settings made in
the window "Style" from one single line to all
other lines on this page. Before you call up the
window "Extended" again, mark the line (place
the cursor in this line) which contains the style
you want to copy. After selecting "Style for all
lines", the settings will be copied.
Similarly to the function mentioned above, you
can copy the font of one line to the other lines
by clicking on "Copy font to all lines". Mark the
line which contains the desired font and choose
the function "Copy font to all lines".
Selecting the “min. Size” button reduces the
text panel to a minimum, meaning that a narrow
border encloses the text inside.
Clicking onto “Visible Size” sets the text panel
to a size visible on a television set.
If you click on the button "max. size" the active
box enlarges beyond the screen edge. This
function is helpful, for example, if you would
like to ll the box background with a transparent
color or pattern.
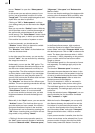
Clicking on the button "Settings" causes a
display to appear in which you can set "Grid"
and "Border".
The "Grid" slider allows you to set the size of the
invisible grid. The box edges are aligned with
this grid so that positioning is easier.
With the "Border" slider you set the distance of
the text box to the screen edge.
It is also possible to move the text box using the
cursor keys of an external keyboard.
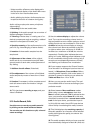
(4) After clicking on the button “Pages” a new
task bar appears in which you can create and
edit pages.
• There you see at the above left (according to
the effect) the label “Page 1/1”. After you have
added a page (see below) you see the label
“Page 1/2”. After an additionally added page
“Page 1/3” appears, etc.
With the help of the right arrow you can move
forward through the pages. The left arrow
displays the previous page.
• By pressing the “Insert” button, you can insert
a new text page. Inserting a new page prompts
SMART EDIT to question if the page is to be in-
serted before or after the current (rst) page. All
pages will automatically be added after the cho-
sen page. A page can only be inserted (added) if
it contains text.
• Pressing “Delete” deletes the current page
and you will see the next available page on the
screen. If you have deleted the last available
page, the previous page will be seen.
• The selection button “All lines” offers three
possibilities: “Top”, “Centered” and “Bottom”.
With these options, you can select the vertical
position of the text lines of all text panels on the
current page.
• The button “Background to all boxes” copies
the background of the current box to all other
panels on this page. The button has no effect if
you are working with just one box.
(5) Clicking on the button "Graphics" causes an
additional task bar to appear.