


74
75
channels and the front left-hand channel, crea-
ting an effect which is similar but not as clear.
• rear right
Rear right functions in a similar manner to rear
left, but for the right-hand rear channel.
In all cases, a mono audio sample is rst genera-
ted from the original stereo sample, as playback
is ultimately through a single loudspeaker only.
- Sample -> Scene
Clicking on the Sample -> Scene button crea-
tes a video sequence with black background
from your audio sample. You can use this video
sequence as a basis for further video operations
(e.g. insert editing). This function can greatly
simplify audio-based editing. Please read Chap-
ter 4.3 for further details.
- Copy Sample
Clicking on the Copy Sample button creates
an identical copy of the the previously clicked
sample in the list of audio samples on the right.
This function is useful when you wish to use
both the original material and a modied versi-
on. The copy appears in the samples list with the
same name as the original, but is identied with
the sufx .K (e.g. A1.K).
- Clipboard
If your system supports this function, you can
place the audio sample onto a clipboard. Clicking
on Clipboard calls up four buttons: Clipboard ->
Project, Sample -> Clipboard, Remove sample
and Sample from project -> Clipboard. These
buttons have the same functions as in the video
menu.
Note: If you click on Delete Sample you will
observe that the OK button in the dialog which
appears is disabled (grayed out) and cannot be
activated. This is a safety measure to prevent
you from accidentally deleting an audio sample.
If you really wish to delete an audio sample, rst
click on the audio sample to be deleted (even if it
is greyed out) and then on the OK button (which
is now enabled). The audio samples are stored
in the samples list and can be inserted into an
audio track in the Audio-Mix menu.
In the same way, rst mark the audio samples in
the samples list which you wish to place on the
clipboard.
Should the samples list contain no samples, the
message No active audio sample available is
displayed.
The main purpose of the clipboard is temporary
storage of audio samples before they are used
in other menus. The clipboard is thus available
across projects.
Any audio samples placed on the clipboard are
deleted when the system is switched off.
Also in this menu you see the button "Pre-listen"
under the effect options.
Here, you have the option of either deactivating
the function ("off"), i.e. either hearing the effect
or the original. Once you select either Effect
or Original, this will loop-play several seconds
of the effect selected in the list (applied to the
music selected in the list of sound clips) or some
seconds of the original sound piece. This option
can save you a lot of time, because the audio
effects can be heard and compared with the
original without being rendered.
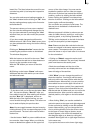
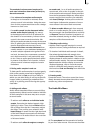
This function also displays signal amplitude as a
control.
Flashing blue indicates that everything is in
order, ashing yellow indicates a risk of over-
modulation during audio mixing (only if several
over-modulated segments are mixed), and as-
hing red indicates over-modulation.
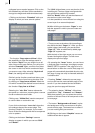
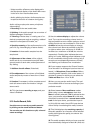
(9) Click on the Split button to access the Split
Sample menu. You can then split audio scenes
in the same way as video scenes. The name of
the audio sample is displayed at the top on the
right-hand side. The name is followed by .1 or
.2 etc. (e.g. A 1.1 or A 1.2). You can of course
click in this eld to call up the keyboard again,
and rename the audio sample. Clicking on the
Split Position button now enables you to split
the audio sample. A graphical display of the part
to be split off is shown in the bar at the bottom.
In addition, the wave form and audio scrubbing
(Chapter 3.2), which cannot be disabled in this
menu, show the point of the audio sample at
which you are located.
The Use and Drop buttons and the arrow
buttons have the same function as in the Split
Sample menu of the image material.
Click on the Play button to start playback of the
audio sample currently being edited. During
playback you can split the sample for example at
a bar by clicking on Use at a suitable point. Your